A how to guide to get you started into organising your grocery shop and meal preparation.
I decided to write an ebook based around one of the things in my life that I’m consistently successful at, that is meal preparation.
There’s something quite satisfying and complacent knowing that you have meals on hand whenever you need them, there’s no need to walk aimlessly around the supermarket after work or the gym, wondering about what you fancy to eat, grabbing a bunch of ingredients, only to have them sat in your pantry or kitchen either rotting or gathering dust.
Productivity is key when it comes to organising your meals and being fuelled when you’re on the go.
I’ve designed a short and simple ebook that demonstrates ways you can start planning towards organising yourself to save money, eliminate food waste and give you more time. Inside this ebook, you’ll select the days and times that work for you to organise the meals that you enjoy eating, along with additional information on food sustainability, how to build a meal using my suggested 4 core food groups along with resources to inspire your cooking style.
Email the address below to order your copy of ‘ready, set, prep’ for only $12.99AUD to start your organised way of eating.
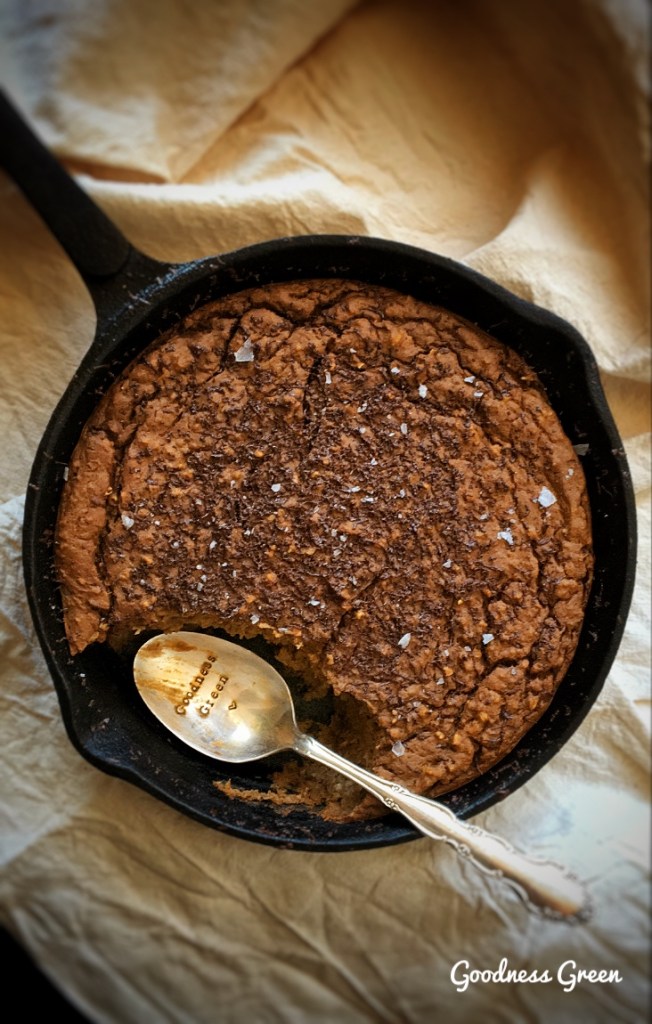
Ramp up your standard morning oats and why not try baking them into a brownie?! This simple yet delicious breakfast skillet has been transformed into what you’d usually divulge in as a chocolate treat, is now fully approved to eat as a brownie for breakfast. With the abundant natural, wholesome ingredients rich is slow release carbs and fibre along with rich antioxidants to support your bodies active day ahead. Follow the recipe and let me know how you get on.
Ingredients;
80g steel cut or regular oats
1 small orange sweet potato puréed or mashed
1/2 mashed banana
1 egg
1 heaped tsp raw cacao
1 tsp vanilla extract
High percentage chocolate
1 cup of milk (dairy or alternative)
3 drops of monk fruit sweetener or 1 tbsp of maple syrup
Pinch of sea salt
Method;
Ideally soak your oats overnight in the milk, cacao, vanilla extract and sweetener as the soaking process helps the starches break down and reduces the natural phytic acid, which can help your body utilize the oats nutrients much more efficiently when digested.
In a food processor or mixing bowl, combine and mix all ingredients – dark chocolate can be cut into chunks and added to the batter and OR grated onto the top when removed from the oven for extra melty goodness!
Pour all combined ingredients in to an oil coated skillet pan and bake at 180C for 30minutes or until firm to touch. Take extra care when removing from the oven.
Shave dark chocolate over the top after removing from the oven and enjoy on its own or with warm milk poured over.
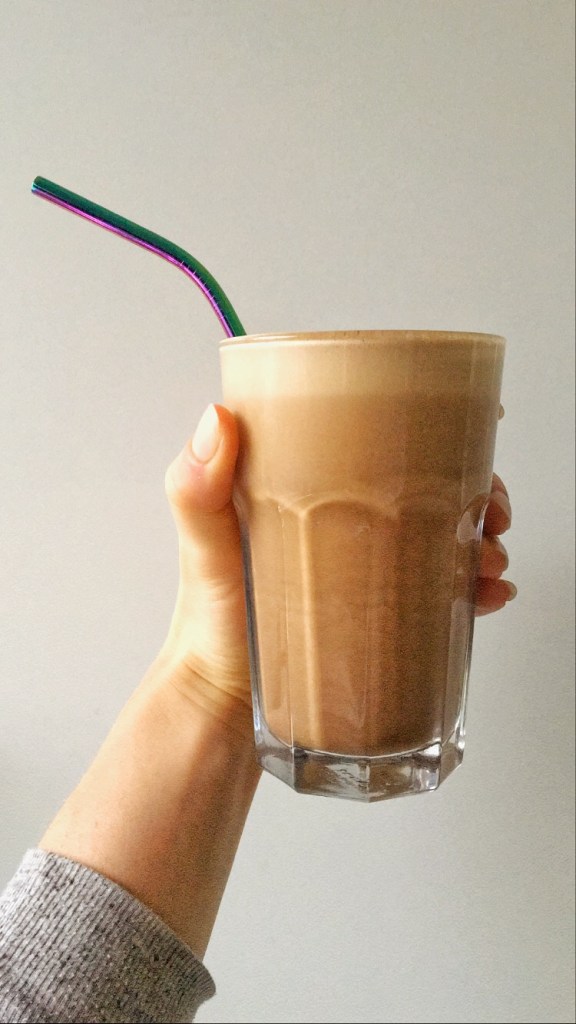
They’re days we act like adults, because we have to, then they’re are days we wish we could be a kid again – I say we combine the two and have the best of both worlds! Lets mix our childhood chocolate milkshake in with our morning coffee and get all the grown up SH*T done. And look, I’ve gone one step further with a mermaid straw, each to there own, do what you’ve gotta do to get your caffeinated fix. heres mine;
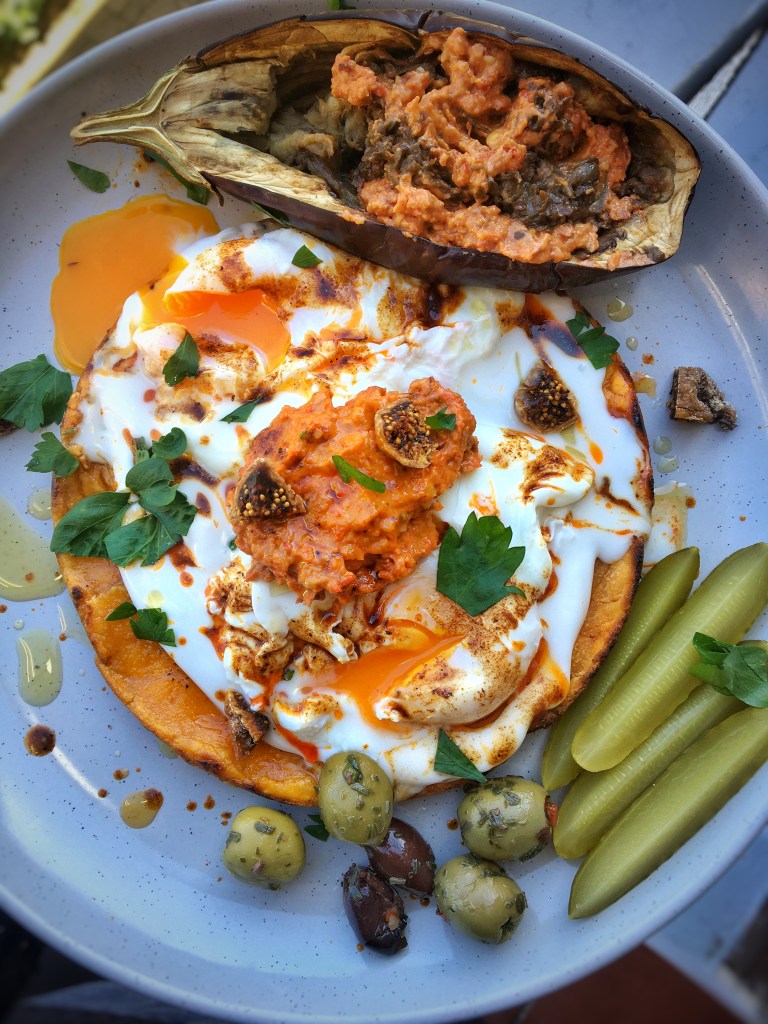
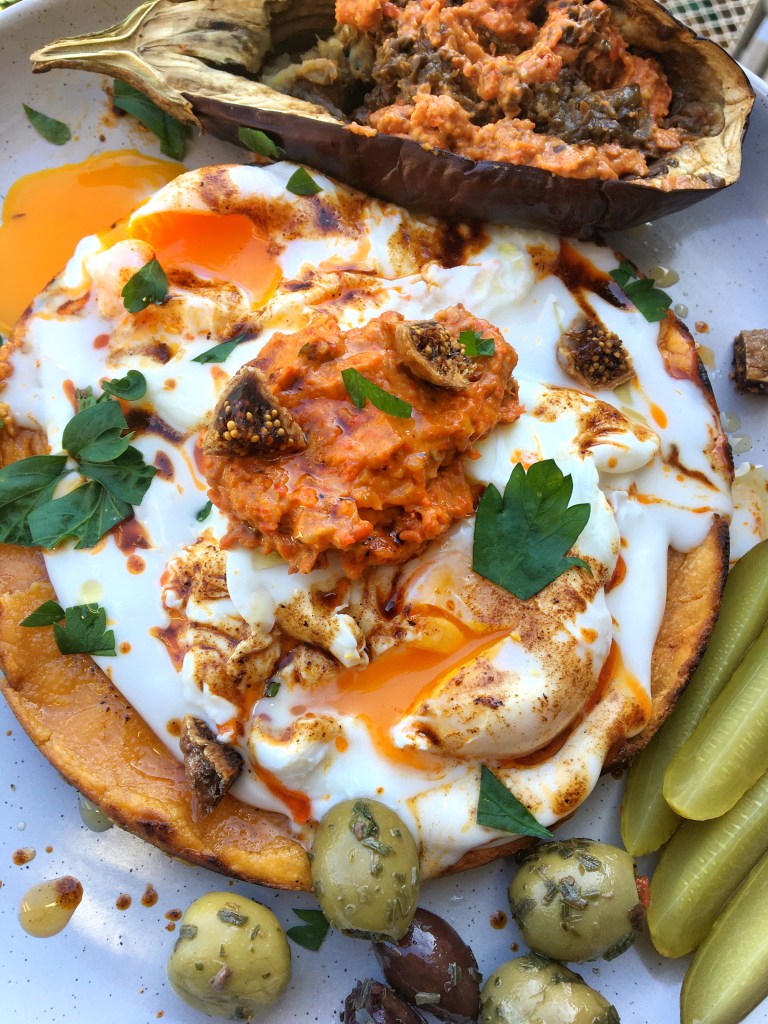
Never been to Turkey myself but I do appreciate the fresh, beautiful and aromatic food. Here, I decided to create my own grain and dairy free version of a Turkish breakfast classic – Turkish eggs. Traditionally this breakfast is made with rich creamy dairy yoghurt – I have subbed this with fresh coconut yoghurt, Then a slice of toasted fresh sourdough is recommended for dip and dunking into the creamy layers – I have subbed this with my own homemade sweet potato nann. What makes this meal so fantastic is the hit of chilli sauce drizzled over the eggs and yoghurt, but for me, the real winner here is the sun dried tomato pesto, not so traditional to this dish but in my opinion it makes this breakfast what it is! As an additional add on it was 10/10.
Makes 1 serving
Ingredients:
Sweet potato Nann
1 small sweet potato
2 tbsp cassava flour
1 tsp baking power
1 tbsp water
Salt and pepper
Coconut oil
Sun dried tomato pesto
3-4 sun-dried tomatos
1/2 juiced lemon
2 tbsp Extra virgin olive oil
1 garlic clove
2 tbsp raw wallnuts
1 red pepper
1 tsp chilli flakes
2 dried Turkish figs
Salt and pepper
Turkish eggs
2 poached eggs
1 tsp apple cider vinegar
2 tbsp fresh coconut yoghurt
Chopped parsley or Dill to garnish
Extra virgin olive oil to drizzle
Chilli sauce
1 tsp Ghee, pastured butter or coconut oil
1/2 tsp smoked paprika
1/4 tsp cayenne pepper
Extras/optional
Slow roasted aubergine/egg plant
Olives
Gherkins
Dried Turkish figs
Goats Cheese
Method:
Lets start with the slow stuff – your roasted red pepper will need to be roasting in the oven for at least 20min, I always like them to be a little charred, so i’d recommend roasting the pepper for 20min at 180C and then check up on it, if its softened and looks to your liking, take it out, otherwise, leave it for a further 10-15minutes. Keep your oven on if you plan to slow roast the aubergine/egg plant also.
SWEET POTATO NANN – cut skin off the sweet potato and place in a saucepan of boiling, salted water to soften this should take up to 10mins. Whilst the sweet potato is cooking, gather your dry ingredients into a mixing bowl and start to heat up, preferably a skillet pan with the coconut oil. When your sweet potato is cooked through (test by pricking with a sharp knife) drain the water out of the saucepan and mash, add to the dry ingredients and use a wide panel spatular to combine until smooth and your mixture looks somewhat like a dough, place this inside the pan and smooth out so the base is even, allow to cook for up to 1minute per side, once browned and crisped, remove from the pan and set aside under some foil to keep warm.
Check on your red pepper baking away in the oven, if it looks good, lets add it to the pesto. But before we do, if you’d like to add a roasted eggplant/aubergine to this meal, I’d suggest placing it in the oven now at 160C until you have finished creating your brekky. THE PESTO – In a food processor, place all ingredients inside (including the roasted red pepper) bitzs up until you have a chunky consistency, hold back or add more of the extra virgin olive oil, to get the texture and consistency you desire.
TURKISH EGGS – there are literally so many ways to poach eggs and everyone has there preference, I will here explain my mums method that works pretty well for me. In a saucepan or frying pan add a shallow amount of water, add vinegar and salt, when the water is simmering, carefully crack and 2 eggs and lower them into the simmering water, cooking time should be around 2minutes max. scoop out the eggs, drain and set aside for one moment. This is where it all comes together!
Plate up the sweet potato nann bread and spoon coconut yoghurt on top, then place the poached eggs carefully on top, I like to add the pesto to the centre with the eggs around, but its totally up to you how you’d like to arrange the ingredients.
CHILLI SAUCE – this takes no time at all. Place all ingredients into a frying pan on a high heat, once combined and you have the consistency of oil sliding around your pan, you’re ready to add this over your Turkish eggs.
THE ADD ON’S – add to your plate the roasted aubergine/eggplant, olives, chopped Turkish figs, crumbed goats cheese, gherkins, fresh dill or parsley and anything else you decide to add, sit, eat and enjoy!
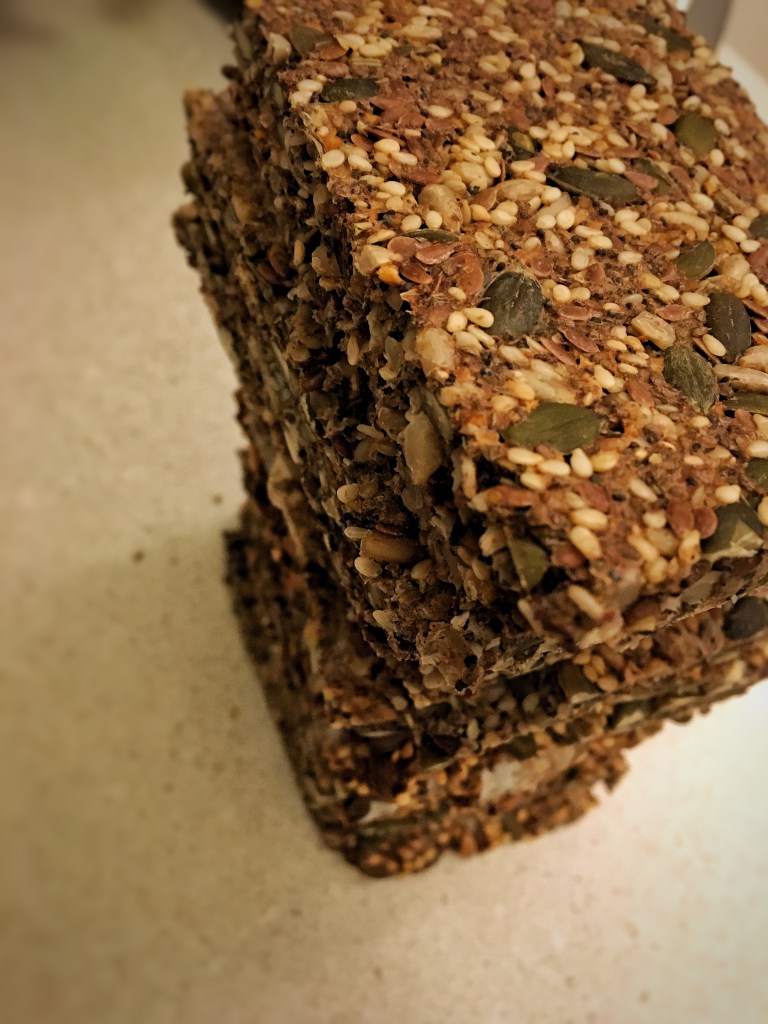
Healthy snacking at its finest! These delightfully nutty, crisp and satiating seed crackers have a subtle herby flavour and great texture, making them a great addition to dips, spreads or general daily snack. I have packed these cracker boards with every seed I could possible find at my local whole foods store and I was amazed at quite how easy they were to make. They were a big hit a a few dinner parties as dipping crackers for guacamole, hummus, baba Ganoush and other dips and spreads. I have become absolutely obsessed and love them!
Whats so good about seeds?
These tiny powerhouses hold so many nutrients, minerals, vitamins and antioxidants, they’re high in fibre, quality good fats – mono and polyunsaturated, along with the very beneficial omega 3 fats. Eating a regular variety of seeds has also been shown to help womens menstrual cycle and fertility when consumed on a correct ‘seed cycling’ method.
Ingredients:
Makes around 12 large crackers
80g pumpkin seeds
80g sunflower seeds
80g poppy seeds
80g flax seeds
80g sesame seeds
80g chia seeds
2 tbsp dried mixed herbs
1 tsp garlic flakes
1 tsp onion powder
Salt and pepper
600ml filtered water
Method:
Place all dry ingredients into a large mixing bowl and ensure everything is combined. Next add the water and leave to soak for 15mins – by soaking the seeds we are activating them, ensuring proper nutrient absorption and better digestion for our bodies.
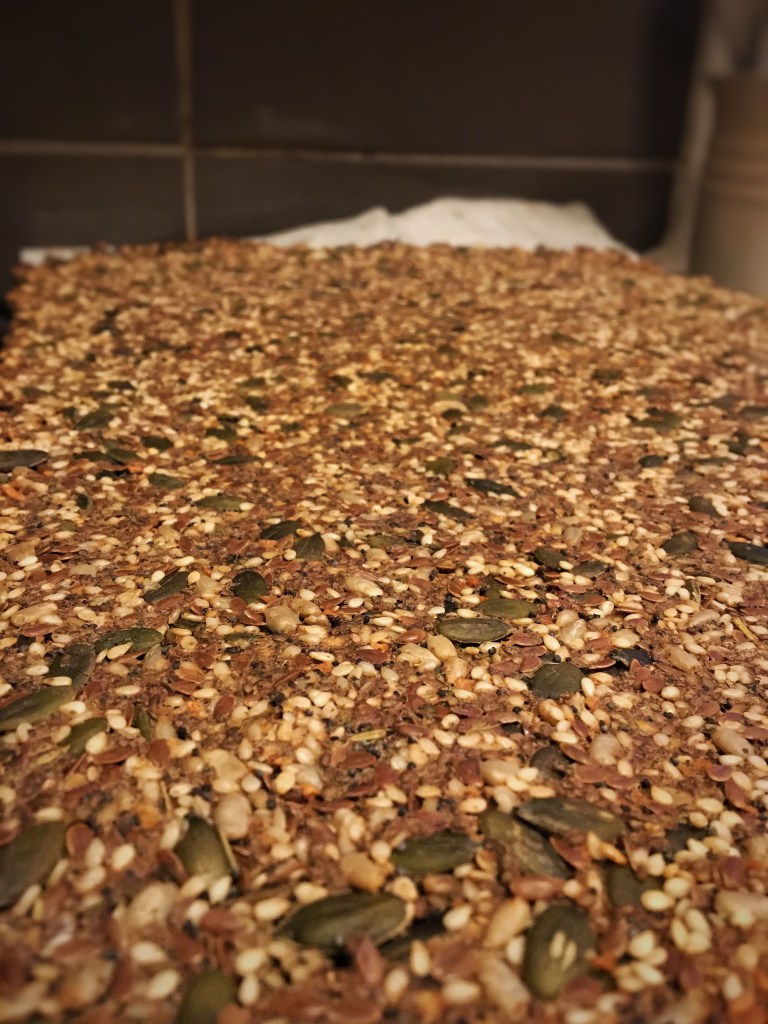
After 15minutes, when the seed mixture has absorbed all the water, grab a spatular and mix once more to ensure all ingredients are combined. On a large baking tray, line with non stick baking paper and drizzle some oil over the top if desired – I find this gives the crackers a little extra crisp and crunch when baking.
Pour the whole contents of the seed mixture onto the baking sheet, spread out and flatten as thin as possible, keeping the mixture glued together (no breaks)
When you have one evenly flat sheet of delicious seeded goodness, add your crackers into the oven at 150c for 1 hour.
Once the hour is up, check the cracker board is hard to tap and remove from the oven, leaving aside to cool for around 10mins before cutting up. Once cut, leave for a further 10 minutes to cool before placing in an air tight container. These crackers will keep for up to 5 days.
*If you find that some of the crackers are still a little soft even after cooking for an hour, once cut, place them back in the oven individually for 10-15 more minutes to dry out and crisp up.
First time I tried one of these little beauties was when I was living in the UK and a friend had suggested I try them out as they were insanely delicious (this being the standard well known peanut butter cup brand) I recall being instantly hooked and tried every single variety the company brought out – the cereal I’m still yet to try.
Stepping away from peanuts when I became strict paleo, I began creating my own nut and seed spreads of every kind. Tampering with foods I eliminated and are now reintroducing, I’m happy my body has re accepted peanuts with open arms! Phew, not sure how I would have dealt with a peanut intolerance?! Those with nut allergies, I really feel for you.
I aim to utilise this page for recipes and experiments creating a variety of nut butter cups. Join me on this exciting journey to the perfect pair of nutty cups 😉
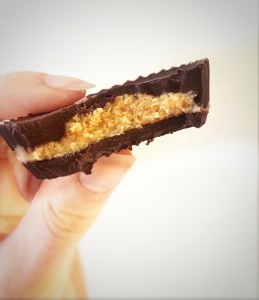
Peanut Butter cups
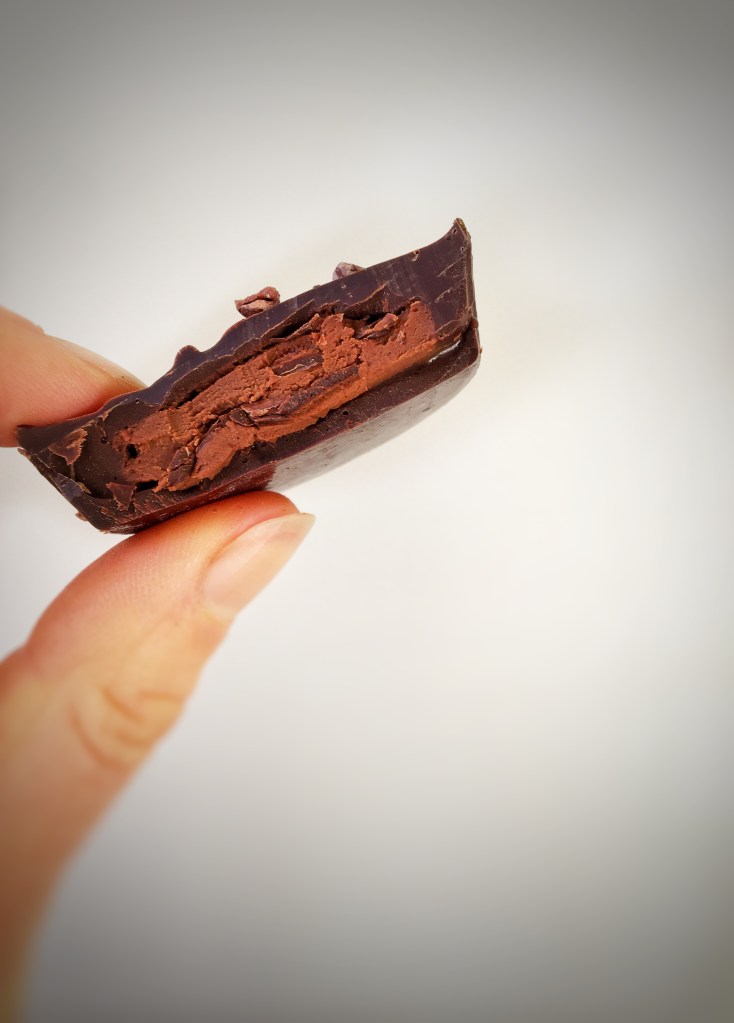
These are the ultimate good fat snack! 100% rich organic dark chocolate, organic rough peanut butter and a sprinkle of flaky sea salt, results in this classic cup being all things KETO, PALEO, VEGAN, DAIRY FREE, GLUTEN FREE and all round delicious.
How do you make them, I hear EVERYONE asking?
Ingredients:
Makes 7 cups
100g Dark chocolate – choose between 75-100%
7 tsp of peanut butter
1 tsp coconut oil
Sea salt
Optional – 1 tbsp maple syrup to sweeten
Method:
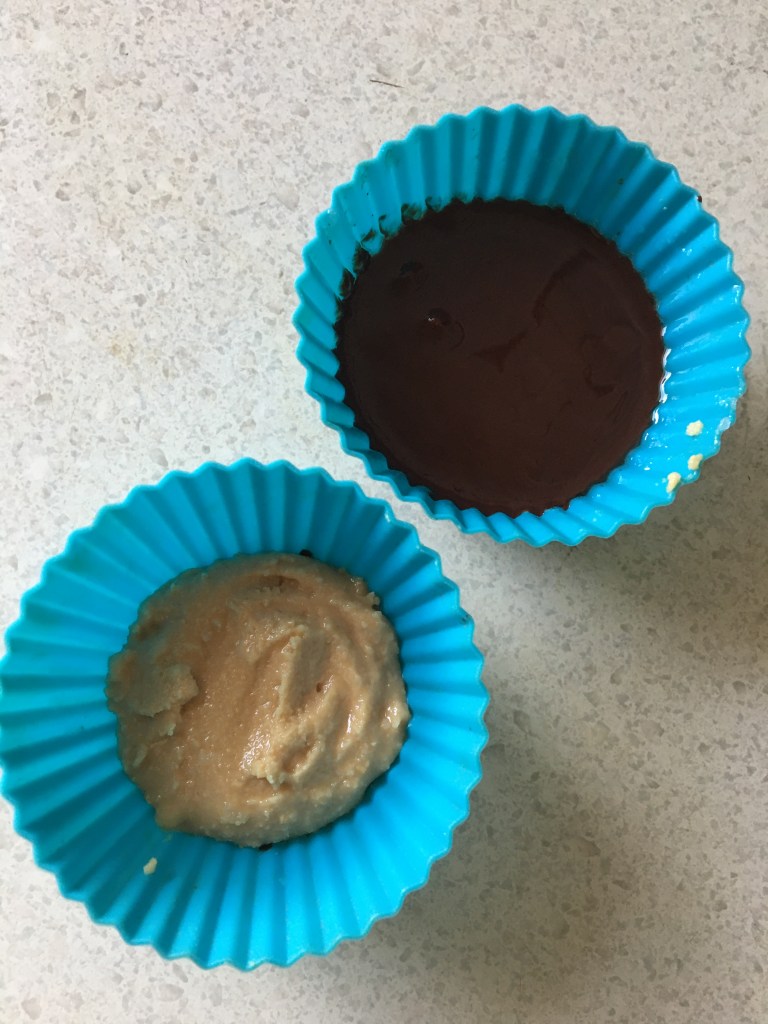
Fill a small saucepan with water and place on a high heat. Place a heatproof bowl on top of the saucepan and break the dark chocolate into the bowl along with the 1 tsp of coconut oil, wait to melt and stir until glossy.
Grease the baking cups if using silicone, then using a teaspoon, scoop and pour 1 tsp of your melted chocolate into the cake case. Once all 7 moulds have been filled, place inside the fridge to allow the chocolate to set, this should take around 15minutes.
Take the moulds out of the fridge and start to spoon in 1 tsp of peanut butter to each mould. If you’d like to add maple syrup you need to mix this into the peanut butter before spooning.
Next you may need to reheat your leftover chocolate thats been sat inside the bowl to spoon the remaining chocolate over the top of the peanut butter. When the peanut butter has been covered, you can place the peanut butter cups back in the fridge to fully set – this should take around 20minutes, however will taste great after a full day to rest. To season/decorate with salt take out of the fridge after 5 minutes – if you do this too soon the salt will sink into the chocolate, too late and the salt won’t stick.
Please note these will melt in the heat like any kind of chocolate, so please be wary of keeping them cool in a seal tight container for extra freshness.
It’s peanut butter jelly time…..
The peanut butter cup has been upgraded, meeting it’s bestie – strawberry jam. Usually I would make my own jam, but as I was slim on time making these for a friends birthday, I had to cheat a little, so this is a store bought jam, 100% strawberries, nothing added.
Follow the recipe above, adding 1/2 a tsp of jam. Leave in the fridge to set and cool for 2 hours, eat and enjoy.
Coconut salted caramel, peanut butter cups
Really, what doesn’t go with peanut butter? It’s pretty good with everything, such a clever little bean! Toady this little legume paired up with the almighty coconut seed to make……… Coconut salted caramel! How does one make caramel from a coconut I hear you ask?! Read on to fine out;
Coconut sugar is produced from the sap of the flower bud stem of the coconut palm tree, almost anything can be made from the coconut seed, husk, leaves, trunk, all of it can be used, as mentioned in a earlier post, when I visited Fiji, locals called it ‘the tree of life’ as it provides so much.
Ingredients for the coconut caramel:
x1 cups of coconut sugar
x1/2 cup of full fat coconut cream
1 Tbsp coconut oil
Cracked rock salt
1 tsp vanilla extract
Method:
Combine the coconut cream, coconut sugar and salt in a saucepan over medium-high heat and wait for it to become fragrant and start to bubble.
Bring to a boil, then immediately lower the temperature, keeping the sauce at a light simmer.
Simmer for 10-20 minutes, stirring occasionally. As the sauce reaches the last 5-8 minutes of cooking time, stir more frequently to incorporate the darker caramel bits from the bottom into the sauce.
Once the sauce has turned a dark amber and has thickened to coat the back of a spoon, remove from the heat and stir in the coconut oil and vanilla extract, the sauce should look fairy thick, it will become thicker once cool.
Serve the sauce warm or refrigerate in a sealed glass jar – if adding straight into your PB cups, refrigerate as this will make spooning the mixture into the moulds, much easier.
Continue to follow the original recipe to complete this amazingly sweet and nutty layered chocolate cup.
Peanut butter and salted pretzel
Something a little different but exactly what you know, if you’ve had peanut butter stuffed pretzel bites, you’ll know how insanely good peanut butter with pretzels are. Here I’ve added salted pretzel pieces inside and a wholesome pretzel on top for added crunch and texture, giving you a biscuity taste when you bite in.
Chocolate praline crunch
With activated buckwheat and puffed quinoa, this nut butter free crinkle cup is the NEW favourite. It’s rich, crunchy with smooth velvety coconut creamed praline tucked away inside.
Espresso
Another nut free goodie. This batch is sweet, yet bitter for all the espresso fans out there. Creating a coffee infused praline, encased inside 70% rich dark chocolate, topped with crunchy cacao nibs, this batch is best suited for those who like it dark and rich.
Strawberry chia
If you like it fruity, this is your batch, filled with 100% natural strawberry jam, when you bite into these crinkle cups your get a sweet hit of sweet tangy jam along with the subtle crunch of chia seeds. This will be my second batch of nut free crinkle cups, I’m curious to learn what people like when It comes to chocolate treats, are you a fan of sweet or bitter tastes? Milk or dark chocolate or perhaps you like white? Drop me a DM I’d love to know.
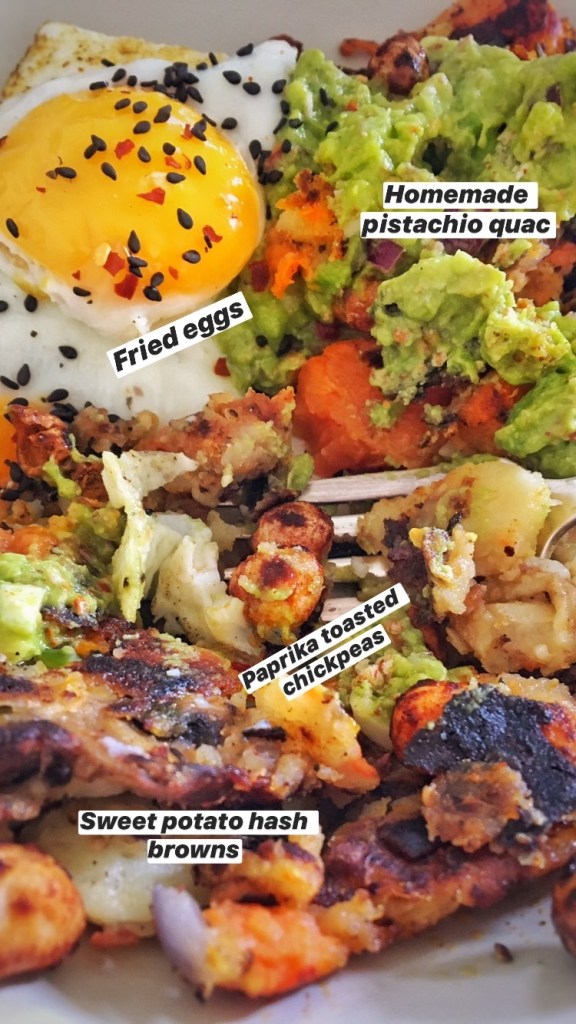
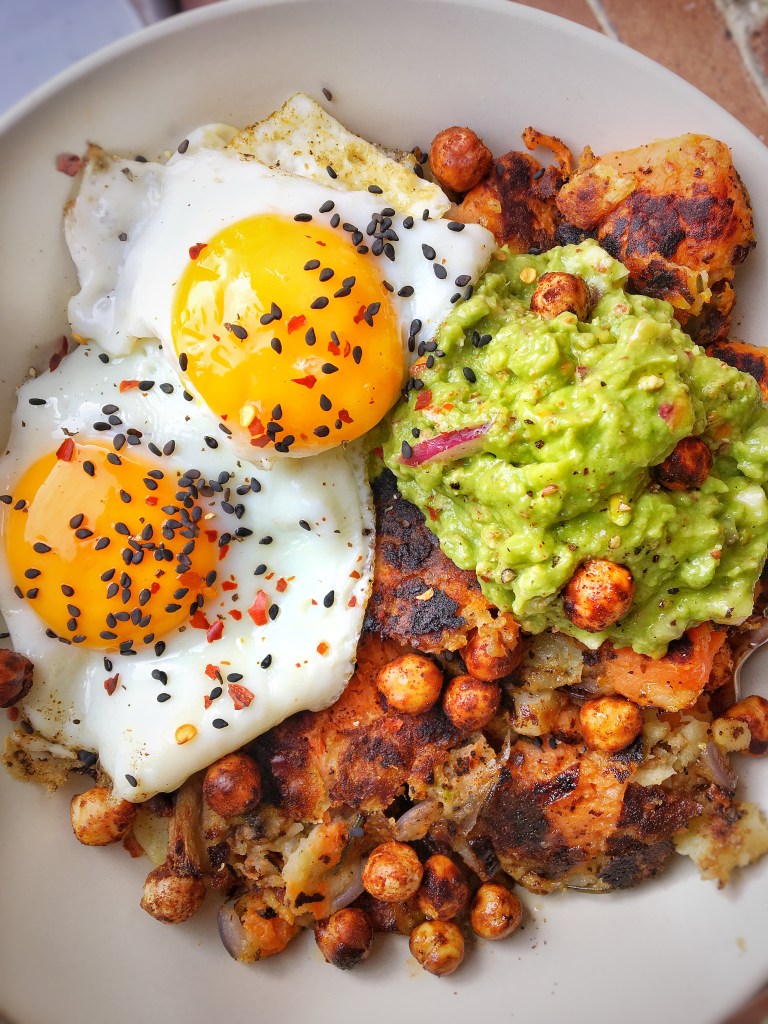
Sometimes, beauty is is messy. Like this hash brown bowl, It’s a little scruffy, it’s a mish mash, but I’ll tell you what, it’s REAL ingredients squished together to make every bite a happy one. The crispy fried potato, fluffy on the inside and crunchy on the outside makes these hash browns sweet and spicy with a jalapeño chilli kick. I topped off this bowl with toasted, smoked chickpeas sunny side up fried eggs AND lets just check out that guac. I tried some new things and magic happened – This in my opinion was my BEST guacamole yet.
Serves 2
Ingredients:
Sweet potato hash
400g Sweet potato
400g White potato
2 Garlic Cloves
1 deseeded Jalapeño chilli
4 button mushrooms
1 tbsp Chopped fresh rosemary
2 -3 tbsp coconut oil
Salt and pepper
Smoked chickpeas
1 full can of drained and rinsed chickpeas
1 tbsp smoked paprika
1 tsp of coconut oil
Pistachio Guacamole
1 large avocado
Handful of shelled roasted and unsalted pistachios
1/4 Red onion
1/4 Freshly squeezed lemon juice
1 tsp Coconut cream
1 Fresh crushed and chopped garlic clove
1 tbsp Almond meal
1 tbsp Extra virgin olive oil
Sprinkle of chilli flakes
Salt and pepper
Eggs
My preference is x4 PASTURE RASIED BIODIVERSE chicken eggs – x2 per person
Methods:
Sweet potato hash
Fill a large pot with salted water, place onto your stove top on a high flame, and allow water to boil.
Chop white and sweet potato into small cubes – you can keep the skin on or peel it – I’ve kept the skins on – Team crispy skins!
Whilst your potatoes are boiling, get to work preparing the chickpeas and Guacamole
Place chopped potato into the pan of boiling water and leave to cook and soften – to test if your potatoes are cooked, carefully prick them with a knife, if the potatoes texture is soft to pierce, your potatoes are ready to drain.
Place potatoes in a large mixing bowl and add garlic cloves, green chilli, sliced or chopped button mushrooms, freshly chopped rosemary, 1 tbsp of coconut oil and mix with a large spoon to coat the potatoes in all ingredients
On a medium heat add 1 tbsp of oil in a large pan, then tip all ingredients from the mixing bowl into the pan, if your pan is too small and you feel like your ingredients don’t all fit evenly, you may have to do this in two batches as we want all ingredients to crisp and fry on the pan.
With a spoon of spatular, press down on the hash brown ingredients to crisp and toast, after around 5min of cooking, start to flip the hash brown to toast the opposite side, it’s ok if it falls apart slightly of you have to break it up to turn it, were not here to make this look Michelin star worthy – it should look a little messy, as long as you toast and fry both sides it will taste great! Try to avoid burning the potatoes, if the pan looks dry this is where you can add additional oil for frying, when you see the hash browns are crispy on both sides, start to plate them up and leave to cool, whilst you start to fry the eggs – *see FRIED EGGS
Smoked chickpeas
Empty the soaked chickpeas onto a baking tray lined with baking/parchment paper and drizzle your chosen oil over the chickpeas, then dust with smoked paprika, if you shake the pan, you’ll be able to coat all the chickpeas in the oil and spice. Place the tray inside your oven for around 15-20 minutes at 170 C, check on the chickpeas around 2-3 times to give the pan a shake, ensuring all sides are toasted and crispy.
Remove from oven when chickpeas have crisped up and leave to cool for 5mins before eating and serving – this little beauties will crisp up even more once left to cool and harden.
Pistachio guacamole
In a medium bowl add Avocado, finely chopped red onion, shelled and chopped pistachios, fresh lemon juice, coconut cream, almond meal, extra virgin olive oil, chilli flakes, salt, pepper, fresh crushed garlic clove. Smash and mix all the ingredients together with the back of a fork and mix until combined and you have yourself and nice chunky guacamole texture.
Sunny side up, Fried eggs
Probably the easiest step, once you’ve finished cooking your hash browns and they’re plated up ready to go, in the same pan, add a little oil and crack both eggs inside, reason we are using the same pan is not just for saving on washing, we want the eggs to soak up any little crumbs from the hash browns, adding flavour and texture.
When the white of the egg looks cooked through, grab a spatular and carefully scoop and lift your eggs out of the pan to crown your hash brown bowl. From here you can get fancy and add the guacamole, decorated with the smokey chickpeas.
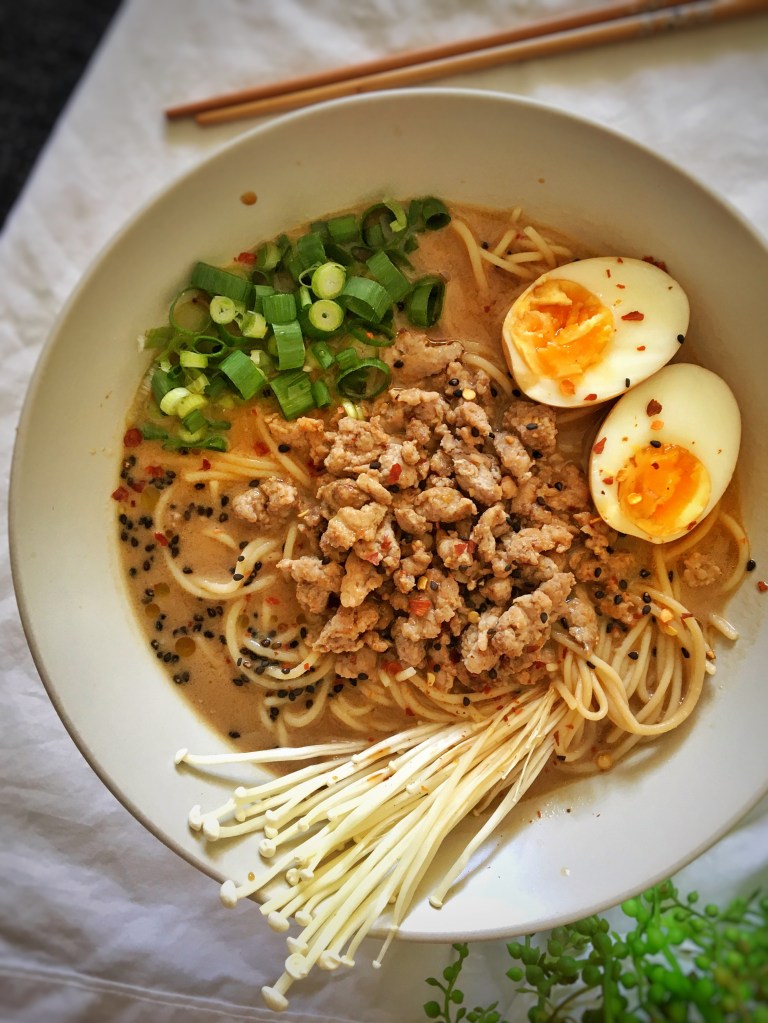
What can i say, Japan has ruined me for all ramen that’s not from the teeny tiny streets, inside a low ceiling restaurant, where I’d be found hugging a bowl of salty, sweet slurpy ramen. Just the best. By no means have I mastered the true craft of ramen making but I must admit, I do make a mean bowl that tastes somewhat similar and is most certainly super nourishing.
Lucky you; I’m sharing this beautiful bowl of creative Japanese inspired wizardry:
CREATE, MAKE, SLURP AND SMILE – It’s goooood.
Ingredients:
Broth
2 Fresh garlic cloves
1 fresh red chilli
1 shallot
1 tsp bone broth concentrate
5 cups of boiling water
3 tbsp Miso paste
2 tbsp fish sauce
2 tbsp coconut Aminos
3 tsp fresh root ginger
Salt
Cracked black pepper
2 tbsp coconut milk + 1/2 cup of water
1 tbsp sesame oil
Your choice of noodle – here I use chickpea noodles
Toppings
60grams Ground pork
1 tsp Chinese 5spice
Salt
1/2 tsp Miso paste
Fresh spring onion
Chilli flakes
Black sesame
Asian Mushrooms
Shoyu egg – x1 egg + 1tbsp coconut Aminos + 1 cup of cold filtered water
Method:
Grab a large cooking pot and spoon bone broth concentrate and 5 cups of boiling water to the pan and place heat on a low heat to allow the broth the sit and simmer.
Add finely chopped red chilli, crushed garlic, finely chopped shallot, 3 tbsp of miso paste, 3 tbsp fish sauce, 2 tbsp coconut Aminos, 3 tsp freshly grated ginger, salt and pepper to the simmering broth.
Allow to sit and simmer on the lowest possible heat for 3 hours.
SHOYU EGG: Soft boil an egg – place an egg in boiling water for 2mins – immediately submerge into cold water for 10mins. Remove egg from water and peel egg shell away. In a cup add 1tbsp of coconut Aminos and fill the remaining cup halfway with cold water, carefully drop the soft boiled egg into the liquid, over time the egg will absorb the coconut Aminos – given how strong you want the flavour add more or less coconut Aminos.
At around 2.5hours add 2 tbsp of coconut milk + 1/2 cup of water to the broth plus 1 tbsp of sesame oil.
Start to prepare and cook up your veggies and garnishes
Prepare the pork mince by salting, marinating with Chinese 5 spice and 1/2 tsp miso paste. Cook on a medium heat and set aside until your ready to serve onto the top your ramen bowl.
Have a taste of you ramen broth and when you feel it’s close to ready, turn off the heat and boil up your noodles in salted water. Once cooked, drain, serve and pour ramen broth over the noodles and place your garnishes, shoyu egg and additional veggies to your bowl.
Soft and sweet pillows of perfection! I bet for most, the idea of making this Italian masterpiece may sound too time consuming and complex, but I can assure you it really is rather easy. Read the simple steps below to create your own.
Ingredients: serves 2
Sweet poato gnocchi
1/4 Flour – Here I have used Cavassa flour, ordinary white bakers flour will work perfectly too, I don’t however recommend nut flours and they don’t hold together when boiling
1 Egg
1 medium cooked (skin off) sweet potato
Salt
1 tsp garlic powder (optional)
1 tsp Coconut or olive oil to pan fry
Coconut cream tomato sauce
1 tin chopped tomatoes
3 tbsp fresh organic coconut cream
1 handful of fresh basil
1 garlic clove
Black pepper
Pinch of salt
1 handful of fresh spinach
Chilli flakes – depending on how hot you’d like this, add or leave out the chilli flakes
To finish Extra virgin olive oil PLUS your choice of chosen veggies – here I have button mushrooms and green beans
Method: Sweet potato gnocchi
On a high heat place water into a saucepan, salt water and boil your peeled, medium sweet potato – leave to boil and soften for around 10mins
Once cooked strain and leave aside to cool
Measure and place flour, egg, salt and garlic in a food processor (this step can also be done by hand, placing ingredients into a bowl and mixing with a wooden spoon or spatular.
Add cooked sweet potato into the food processor and blitz ingredients until a dough consistency has formed – if the dough seems sticky add an additional tbsp of flour and re mix.
When all ingredients have combined, dust your worktop with a sprinkle of flour and begin kneading the dough into a soft ‘play dough’ like consistency. Roll out into one long sausage shape and then with the back of a fork, lightly press down onto the dough, scoring the gnocchi from top to bottom as shown in the photo above.
With a knife cut inch sized parts so that each piece of gnocchi is a similar square shape.
Heat a salted pan of water and bring to the boil
Very gently drop your gnocchi one at at time into the boiling water – when the gnocchi have risen to the top they are ready to scoop out and drain.
Once all gnocchi are out of there salt bath you can start to heat a frying pan (medium heat) with you tsp of chosen cooking oil
Without overcrowding the pan, allow you gnocchi to cook and brown in the pan, when they look golden and crisp – remove them and set to one side.
Coconut cream and tomato sauce:
If you have a smoothie blender and or food processor place all ingredients (accept your chosen vegetables- these you will cook separately) inside and blitz up until smooth.
Place tomato sauce into a cooking pot and simmer for 5 mins
Add gnocchi to the sauce and on a very low heat and simmer for a remaining 5mins whist you either cook up your veggies and or wash up.
Serve up with veggies and a drizzle of extra virgin olive oil onto the sauce. ENJOY!
After reading a book called ‘Deep Nutrition’ I realised in order to consume the best protein out there, it needs to either be organ meat or meat off the bone. Most of these cuts are wasted as customers want the convenience of cooking boneless muscle without the nuisance of cooking the carcass for long durations, picking out bones or perhaps western cultured people just don’t know how to cook these cuts of meats? As a society have we lost touch with our ancient traditions unlike some asian cultures that use every part of the animal possible, Where beef oesophagus, chicken feet, pig brain and sheep lung are a prized ingredient to eat. Some people are squeamish to organ meat and are unwilling to try it out given the incredible health benefits that you will struggle get from a supplement or vitamin and these cuts are so high in muscle building properties, joint health support, vitamin A, B1, B2, B6, B12, vitamin C, Magnesium and also rich in the essential nutrients folate, iron and choline. I was and still am slightly squeamish about trying these foods and its been an experiment of bravery as well as culinary experimentation, I’ve done my own research to find out how traditionally the best way to cook these cuts of meat are in order to help support my own bodies health and utilise more of the whole animal, creating less waste.
Here’s how I went;
Week 1: SLOW COOKED CHICKEN NECKS IN A LEMON/THYME BROTH
This meal was made in my slow cooker for around 12 hours, I added a lemon and thyme bone broth concentrate, along with white shredded cabbage, celery and white onion, I then paired it with my usual base salad of coconut oil fried kale, roasted mushrooms, broccoli and white baby new potatoes. I liked this meal a lot, I found it very time consuming removing all of the small bones, but once done, this really is a nourishing meal prep with a lot of flavour.
Its funny as when I was doing some research into cooking chicken necks, almost 95% of the articles were based on how to feed chicken necks safely to your dog. I thought surely someone cooks these up somehow that tastes good, otherwise why would butchers and supermarkets sell them?! Pinterest had some great tips and tricks, so I highly recommend this page if you ever want fresh ideas for recipes, a great source.
Per 150g serving my portion size contained around 23g protein, 11g fat, 10% total iron
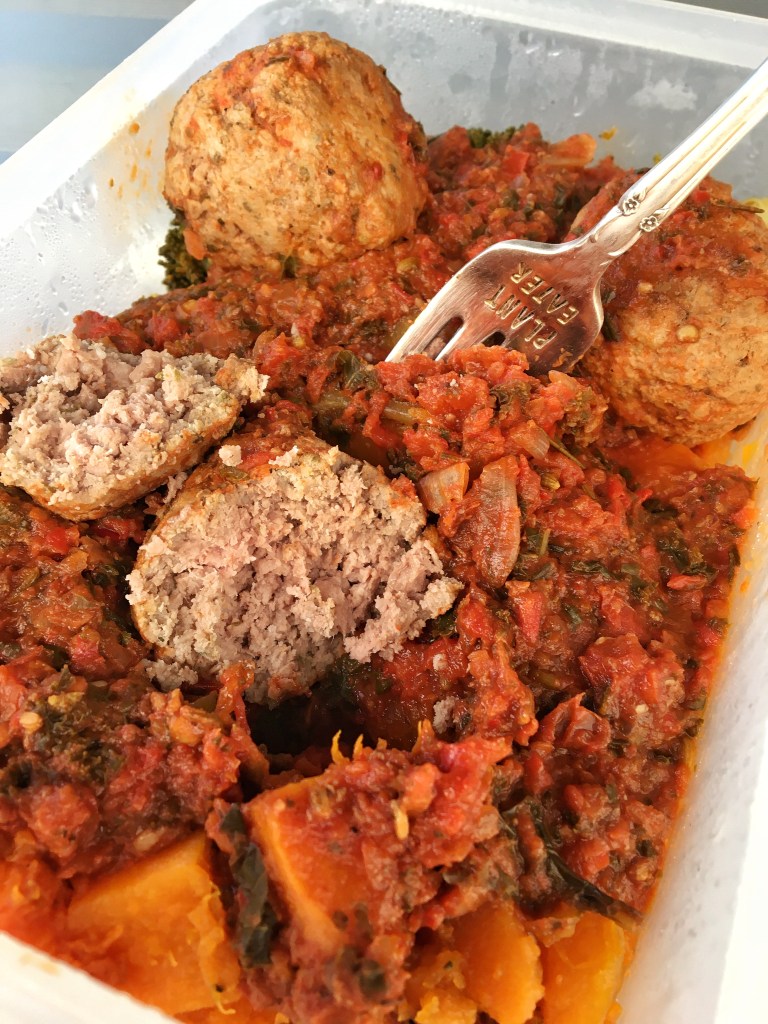
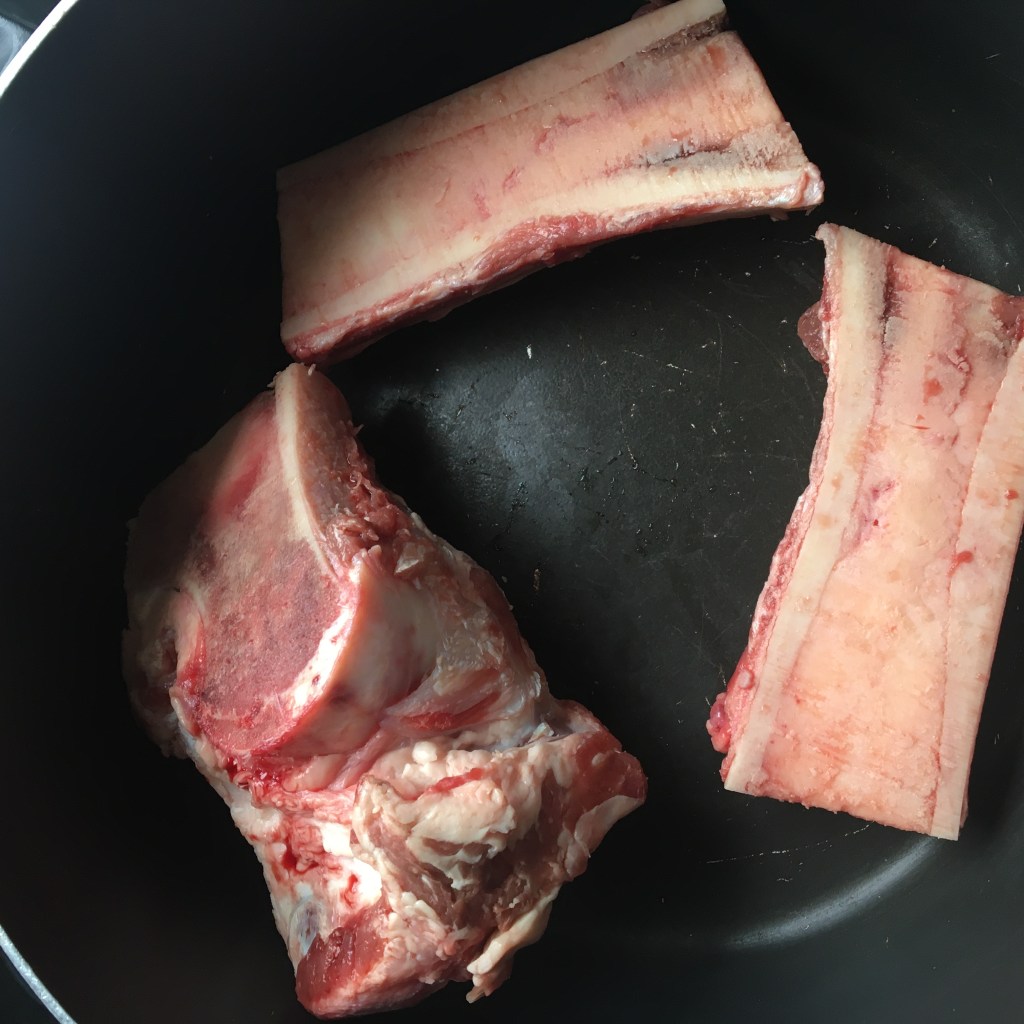
Week 2: BEEF MEATBALLS IN ABONE MARROW TOMATO SALSA
This recipe was my standard meatball recipe with the beef bone marrow bones cooked into the sauce. The flavours were rich as bone marrow is so beautifully fatty. I think meatballs are quite literally my favourite meal so enhancing them with the marrow did nothing but make this recipe better.
Bone marrow contains several health-promoting compounds, including collagen, glycine, and glucosamine, these compounds have been linked to decreased inflammation, better skin health, and improved joint function due to there high collagen content.
Per 100g bone marrow will contain roughly 7g of protein and 84g of fat, 25% of its contents is iron. Whilst this food is super fatty, its health benefits as mentioned above are incredible and you needn’t eat a lot to reap the benefits, here I ate around 10-20g per serve.
Week 3: OXTAIL STEW
This meal is by far my favourite into this 6 week experiment, never had a tried oxtail before and I can happily say its the most flavoursome, tender and slightly sweet meat. Beautiful.
I made this in my slow cooker, with bone broth concentrate, red wine, organic tinned tomatoes, mixed herbs, fresh thyme and oregano, leek, white onion, garlic, celery, duck fat roasted potatoes along with my base salad of broccoli, mushrooms and kale.
Real gravies and sauces made from bones simmered for long periods of time have the most delicious meaty jelly – sounds gross but packed full of flavour and collagen, this stuff is so good for your overall gut health, hair, skin, nails and joint health. I will definitely be making this stew again, I eat all my meals cold, I don’t re heat any of them, this for me was eaten over the course of one of Sydney hottest weeks, it would definitely work as a great winter warmer if you like lighter meals in the summer, I however will eat anything at anytime of the year.
With each 150g serving oxtail provides roughly 61g of protein, 28g fat, equating to 42% of its contents in iron.
Week 4: CURRIED CHICKEN LIVER
I’ll be honest this was probably my most dreaded meal prep of the entire challenge as my mind takes over to the worst possible thought process of how this meal prep will taste, what the texture will be like and overall, exactly what and where this organ has come from. Silly really when you break it down and think about it logically, muscle comes from the animals carcass as do the organs, in reality what is the difference? They serve different functions when the animal is living and when consumed they serve very, VERY different nutritional purposes. People tend to think of protein as just that, PROTEIN, well theres a lot more to it than that. Organ meats as I’ve mentioned are the MOST NUTRIENT DENCE foods in the world – FACT. What you get from organ meat will be more nutritionally authentic to anything you consume as a vitamin or supplement.
Chicken liver contains per 150g, roughly 28g Protein, 8g of fat, Vitamin A – 15.3g, 23 in vitamin C and 20 in Magnesium, equating to 84% of its content to be iron.
I found a recipe from Pete Evans In his cook book ‘going paleo’ using many strong spices and flavours, I figured this would be the right path to venture down when cooking liver for the first time given its reputation for having a ‘metallic’ taste.
Served with organic lentils, Kent pumpkin an a mixed veggie salad I found this meal prep to be very strong in flavour meaning I hardly tasted the liver, the texture is very soft so it breaks down very well with each bite. I think I will likely make this again with as a one off dinner a pose to a full weeks meal prep, this kind of meat is definitely best served warm and fresh.
Week 5: PIG TROTTERS
6 little pig trotters made it into my meal prep this week and what an effort it was trying to cook them up. Honestly, I felt way out of my depth with these wee little hooves, never in my life have I cooked any form of feet! The only time I’d ever bought pigs trotters was for my dog as a Christmas gift!
Speaking with a friend from china who cooks this regually as a staple side dish at home, she helped me grasp some understanding of how best cook up the feet for maximum flavour.
Adding pulled pork shoulder to pack this meal out I started by roasting the trotters in coconut oil and fresh herbs for around 4 hours. The skin was crisp and beautifully roasted but there was no way I could cut what little meat there was on them off. Chatting to my mum via FaceTime, she suggested I place them in a slow cooker to soften, thinking to myself, thats a ridiculous amount of time to cook something that has such little meat and flesh, we’re looking at almost 14 hours of cooking time here?!
I followed mums suggestion and placed all 6 feet in with the pork shoulder and left them in the pot to slowly cook through until the morning, I figured to myself if anything they’ll give the pork shoulder a great tasting stock/broth. When I came down in the morning, all the joints, bone, skin and cartilage had completely come away and cooked through along with the pork shoulder meat. I wasn’t expecting this, so out came my tongs where (like the chicken necks) I carefully picked out every single bone I could find, large and small, until I was left with this incredibly smelling container of pulled pork feet and shoulder.
I served this meal prep with shredded white cabbage, celery, my staple base vegetable salad and oven roasted granny smith apples.
The overall result – I was blown away! The crunchy, yet soft texture was so sweet and delicious I couldn’t believe how good it was. After refrigerating, I literally couldn’t scoop the meat out of the container to add to my salad, I would have to cut the meat out due to the high gelatine content, it was like cutting and carving out little cubes of meaty jelly. Sounds gross but oh my goodness it tasted incredible.
It now baffles me how much as a society, we waste such quality produce. Butchers sell these cuts cheap as most people will buy these cuts for there dogs, great for the dogs but why aren’t we eating this? I’m starting to see that some of our beloved pets are eating a better diet than we are.
100g serving provides roughly, 25g protein, 15.7g of fat, low in iron but high in nutrients, pig trotters are loaded with collagen – containing a number of amino acids in every three glycine, Pork has the highest percentage of any other meat.
Week 6: BEEF HEART – Happy valentines
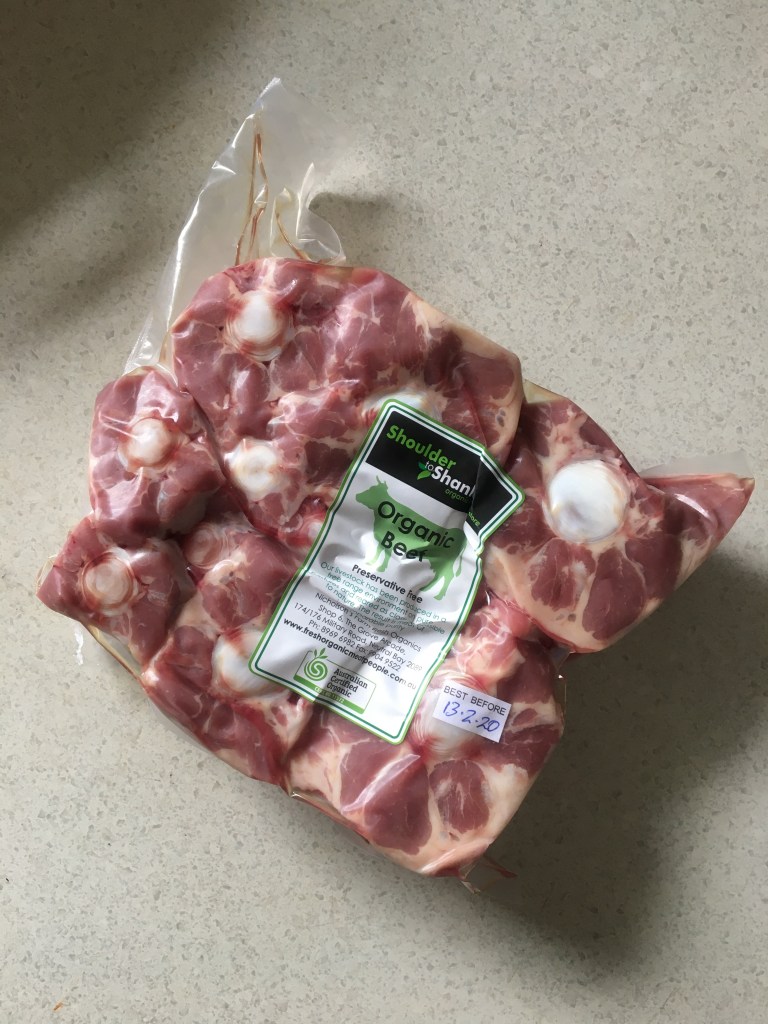
This week was ALWAYS going to be heart what with it being valentines day this Friday.
The biggest shock for me this week when heading into the butchers was the sheer size of a beef cows heart. Probably about the size of my head. Weighing in at 1.6kgs and costing $13, turns out it pays to save when you eat the cuts no one else wants to eat.
The butchers kindly cut, trim and clean the heart, apparently they have to do this before selling to you, which is good to know as I’m not sure how well I would have handled all the anatomy to cut through in preparation for cooking.
I did a lot of research on how best to cook up beef heart and the same recipe methods came up each time, which was to skillet pan fry/sear the meat. As heart is a muscle, its best cooked like a steak – medium rare and bloody. The meat should be marinated before hand and left for around 2 hours to absorb the salt and spices.
Cooking beef heart was an easy task that anyone could do and the taste – I honestly couldn’t say theres any difference between heart and a cut of steak. Its juicy, tender, flavoursome and tastes to me, just like a quality piece of sirloin.
Given the nutrient density and the price I would definitely have beef heart again. I lacked a marinade with this meal prep so when I eat it again I will most definitely add some kind of sauce to complement the red meat.
Heart is rich in folate, iron, zinc and selenium along with the beautiful B’s – B2, B6 and B12. Its high in protein, with around 48g per 150g and 8g of Fat equating to 60% of its content to be iron, this meat is a great source of nourishment to your meal.
Evaluation:
Coming from a childhood where I absolute hated eating most foods, mealtimes were such a anxious task everyday at home and especially in social situations, I truly would rather go without then eat something that looked/smelled odd or different. I realise now my mum had the patience of a saint persisting with my fussy eating and cooking up whatever she could in the hope that I would eat at least a few bites.
All grown up and I’m proud of the fact that I’m now eating the healthiest I have in my entire life and I’m doing what I can to constantly learn and educate myself on the highest quality foods for my body. Most people will know I love cooking and baking, so this 6 week challenge has certainly stretched me to a new point of self development where I’ve been so far out of my comfort zone I’ve had no choice but to ask questions, experiment, try new things and research.
Top 5 biggest take aways from this challenge;
Save your money – Off cuts and organ meats are usually pretty cheap purely because the general population don’t buy them, unless you’ve culturally been brought up eating it, it’s likely these parts are sent off to pet food companies and worse, wasted and thrown out. Most meat is sold by weight and as mentioned any organ meat or off cut such as the bones will be relatively cheap.
Support your local butcher – There’s likely a small chance you will find these cuts in your local supermarket when it comes to the real nitty gritty stuff. Liver and chicken necks can be found in most large chain supermarkets, however I do recommend sourcing your local butcher and chatting with them about the protein you’d like to buy, butchers are like primal chefs, they know what cuts work for certain dishes and they are genuinely happy to help you out in any way they can.
Im fully aware we are not dogs, nor did we evolve from them, However, I do believe our pets eat better than we do sometimes, I know of people that will feed there dogs a 100% grass fed carnivore diet, for some their pets are paleo, even I am guilty, years ago when I lived in the uk my hamster was paleo, she ate only fruit, vegetables, worms, crickets and water, I was very adamant that she ate the best food, yet we seem to neglect this ethical priority for ourselves. The worlds most nourishing foods are literally within our reach, they contain so many healthy beneficial properties and yet we do not consume them, why? I’d like to be the influence to people to try new foods and explore, you don’t have to eat these cuts everyday but it is healthy to expose yourself to new experiences every now and then.
100% RESPECT – It genuinely concerns me how unconscious and oblivious we are to any form of animal produce being a product on the shelf that we mindlessly toss into our shopping basket, take home, cook up and consume. How many people ask themselves. – where has my produce come from? Are the animals treated the way I would like them to be treated? Do they have space and the environment to live a humane lifespan? Think about what your values are, personally I don’t buy the RSPCA certified produce because the animals are fed an artificial diet of corn/soy or as they label it 100% vegetarian feed. Knowing what I know from research – cows and sheep eat grass and if they have eaten a grass fed diet it will be labeled that way, along with pasture raised pigs and chickens – these animals are omnivores, they will eat both plants and animals, did you know chickens will eat mice and birds? No animal is designed to eat corn, in their natural environment these would not be found, animals would have access to eat berries, leaves, worms, other insects and small mammals. Corn has very little nutritional value, meaning if the animal isn’t getting any nutrients, by consuming the meat, what nutrients are you gaining? Do you research and Be knowledgeable.
For me I think the most transformative thing is being mindful of what I’m eating and having a great deal of appreciation for what I’m consuming – this was once a living animal. I really do feel as a westernised society we don’t look at food the way our ancestors used to eat, when hunting, foraging, preparing, cooking and eating, food was a true ritual. I look at food so differently now, from even last year, we live in such abundance and we are so fortunate to have the foods we do at our convenient reach, I’ve heard many times that “food can be our medicine or the slowest form of poison” this is so powerful and relates to every living thing. I’m certainly fuelled to continue educating myself on the effects of foods on our bodies, where our food comes from, sustainability and hopefully influencing others to make better choices in what and how they eat.


You must be logged in to post a comment.