Eat, Savoury, Spreads

Turkish Eggs

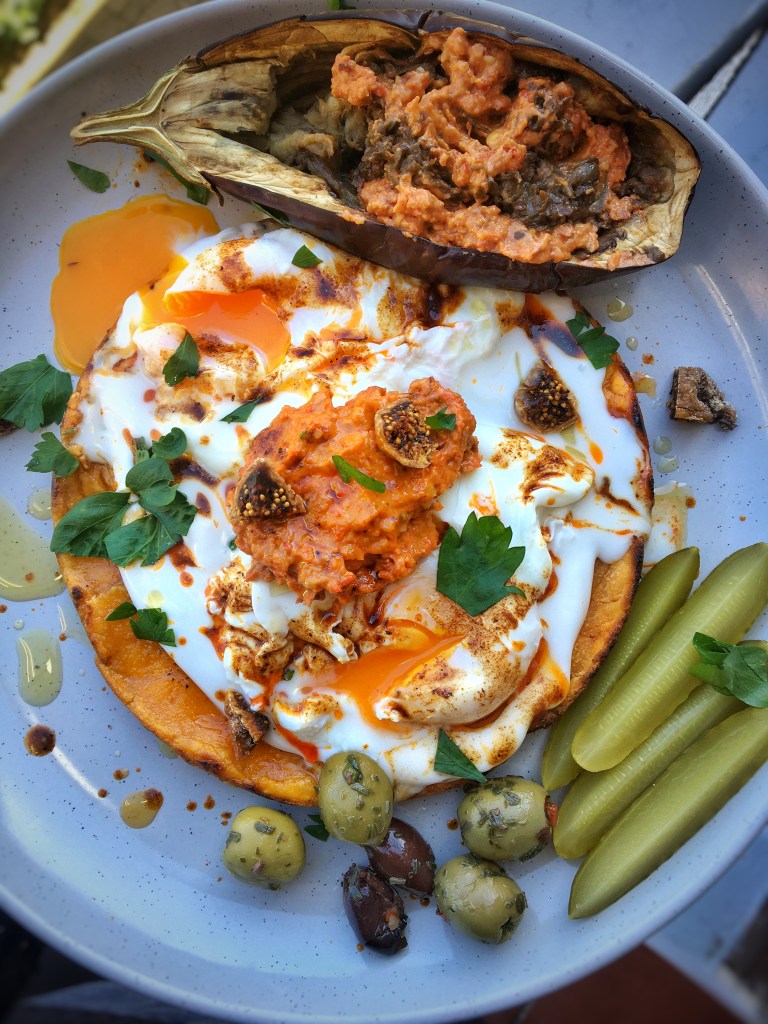
Never been to Turkey myself but I do appreciate the fresh, beautiful and aromatic food. Here, I decided to create my own grain and dairy free version of a Turkish breakfast classic – Turkish eggs. Traditionally this breakfast is made with rich creamy dairy yoghurt – I have subbed this with fresh coconut yoghurt, Then a slice of toasted fresh sourdough is recommended for dip and dunking into the creamy layers – I have subbed this with my own homemade sweet potato nann. What makes this meal so fantastic is the hit of chilli sauce drizzled over the eggs and yoghurt, but for me, the real winner here is the sun dried tomato pesto, not so traditional to this dish but in my opinion it makes this breakfast what it is! As an additional add on it was 10/10.

Makes 1 serving

Ingredients:

Sweet potato Nann

  • 1 small sweet potato
  • 2 tbsp cassava flour
  • 1 tsp baking power
  • 1 tbsp water
  • Salt and pepper
  • Coconut oil

Sun dried tomato pesto

  • 3-4 sun-dried tomatos
  • 1/2 juiced lemon
  • 2 tbsp Extra virgin olive oil
  • 1 garlic clove
  • 2 tbsp raw wallnuts
  • 1 red pepper
  • 1 tsp chilli flakes
  • 2 dried Turkish figs
  • Salt and pepper

Turkish eggs

  • 2 poached eggs
  • 1 tsp apple cider vinegar
  • 2 tbsp fresh coconut yoghurt
  • Chopped parsley or Dill to garnish
  • Extra virgin olive oil to drizzle

Chilli sauce

  • 1 tsp Ghee, pastured butter or coconut oil
  • 1/2 tsp smoked paprika
  • 1/4 tsp cayenne pepper

Extras/optional

  • Slow roasted aubergine/egg plant
  • Olives
  • Gherkins
  • Dried Turkish figs
  • Goats Cheese

Method:

  1. Lets start with the slow stuff – your roasted red pepper will need to be roasting in the oven for at least 20min, I always like them to be a little charred, so i’d recommend roasting the pepper for 20min at 180C and then check up on it, if its softened and looks to your liking, take it out, otherwise, leave it for a further 10-15minutes. Keep your oven on if you plan to slow roast the aubergine/egg plant also.
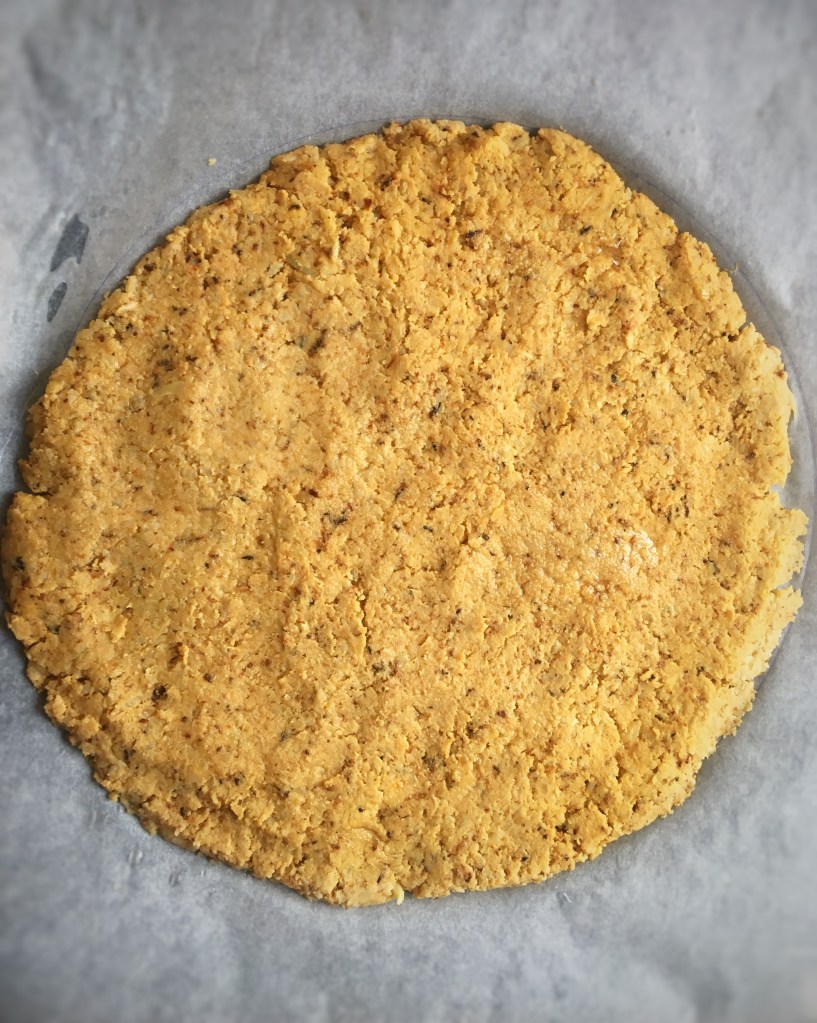
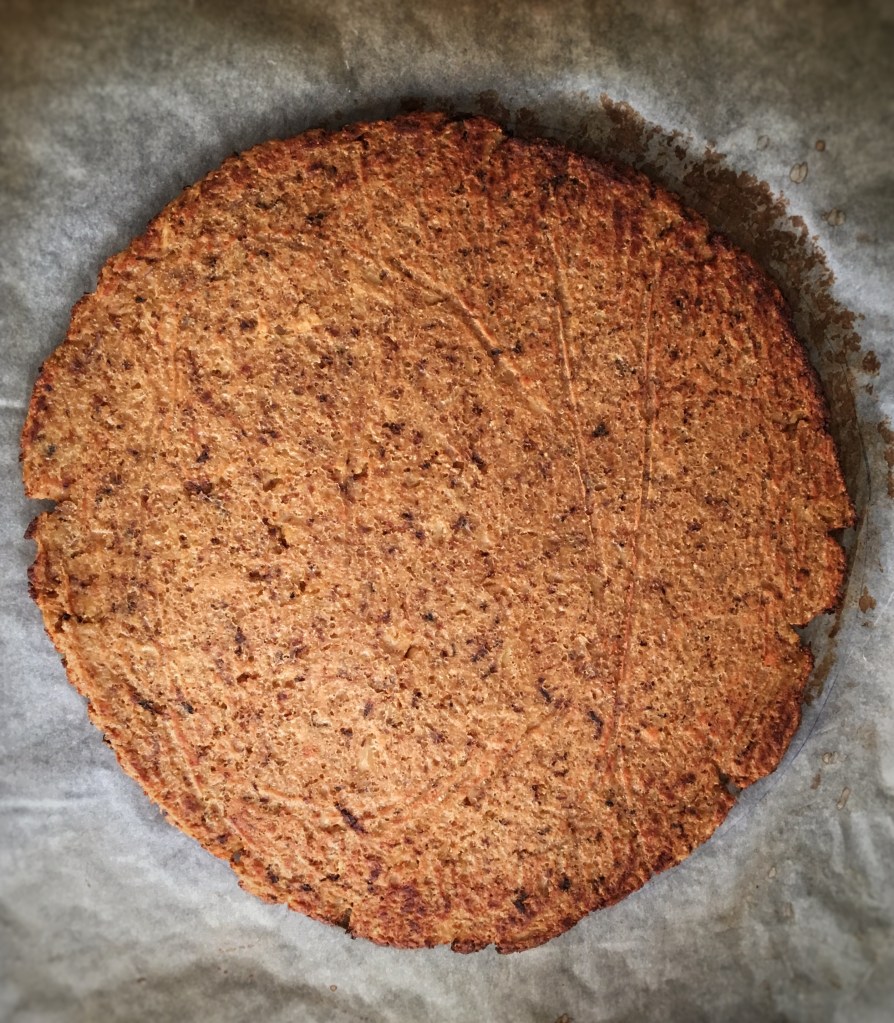
  2. SWEET POTATO NANN – cut skin off the sweet potato and place in a saucepan of boiling, salted water to soften this should take up to 10mins. Whilst the sweet potato is cooking, gather your dry ingredients into a mixing bowl and start to heat up, preferably a skillet pan with the coconut oil. When your sweet potato is cooked through (test by pricking with a sharp knife) drain the water out of the saucepan and mash, add to the dry ingredients and use a wide panel spatular to combine until smooth and your mixture looks somewhat like a dough, place this inside the pan and smooth out so the base is even, allow to cook for up to 1minute per side, once browned and crisped, remove from the pan and set aside under some foil to keep warm.
  3. Check on your red pepper baking away in the oven, if it looks good, lets add it to the pesto. But before we do, if you’d like to add a roasted eggplant/aubergine to this meal, I’d suggest placing it in the oven now at 160C until you have finished creating your brekky. THE PESTO – In a food processor, place all ingredients inside (including the roasted red pepper) bitzs up until you have a chunky consistency, hold back or add more of the extra virgin olive oil, to get the texture and consistency you desire.
  4. TURKISH EGGS – there are literally so many ways to poach eggs and everyone has there preference, I will here explain my mums method that works pretty well for me. In a saucepan or frying pan add a shallow amount of water, add vinegar and salt, when the water is simmering, carefully crack and 2 eggs and lower them into the simmering water, cooking time should be around 2minutes max. scoop out the eggs, drain and set aside for one moment. This is where it all comes together!
  5. Plate up the sweet potato nann bread and spoon coconut yoghurt on top, then place the poached eggs carefully on top, I like to add the pesto to the centre with the eggs around, but its totally up to you how you’d like to arrange the ingredients.
  6. CHILLI SAUCE – this takes no time at all. Place all ingredients into a frying pan on a high heat, once combined and you have the consistency of oil sliding around your pan, you’re ready to add this over your Turkish eggs.
  7. THE ADD ON’S – add to your plate the roasted aubergine/eggplant, olives, chopped Turkish figs, crumbed goats cheese, gherkins, fresh dill or parsley and anything else you decide to add, sit, eat and enjoy!
Eat, Savoury, Spreads

Super seed crackers

Healthy snacking at its finest! These delightfully nutty, crisp and satiating seed crackers have a subtle herby flavour and great texture, making them a great addition to dips, spreads or general daily snack. I have packed these cracker boards with every seed I could possible find at my local whole foods store and I was amazed at quite how easy they were to make. They were a big hit a a few dinner parties as dipping crackers for guacamole, hummus, baba Ganoush and other dips and spreads. I have become absolutely obsessed and love them!

Whats so good about seeds?

These tiny powerhouses hold so many nutrients, minerals, vitamins and antioxidants, they’re high in fibre, quality good fats – mono and polyunsaturated, along with the very beneficial omega 3 fats. Eating a regular variety of seeds has also been shown to help womens menstrual cycle and fertility when consumed on a correct ‘seed cycling’ method.

Ingredients:

Makes around 12 large crackers

  • 80g pumpkin seeds
  • 80g sunflower seeds
  • 80g poppy seeds
  • 80g flax seeds
  • 80g sesame seeds
  • 80g chia seeds
  • 2 tbsp dried mixed herbs
  • 1 tsp garlic flakes
  • 1 tsp onion powder
  • Salt and pepper
  • 600ml filtered water

Method:

  1. Place all dry ingredients into a large mixing bowl and ensure everything is combined. Next add the water and leave to soak for 15mins – by soaking the seeds we are activating them, ensuring proper nutrient absorption and better digestion for our bodies.
  2. After 15minutes, when the seed mixture has absorbed all the water, grab a spatular and mix once more to ensure all ingredients are combined. On a large baking tray, line with non stick baking paper and drizzle some oil over the top if desired – I find this gives the crackers a little extra crisp and crunch when baking.
  3. Pour the whole contents of the seed mixture onto the baking sheet, spread out and flatten as thin as possible, keeping the mixture glued together (no breaks)
  4. When you have one evenly flat sheet of delicious seeded goodness, add your crackers into the oven at 150c for 1 hour.
  5. Once the hour is up, check the cracker board is hard to tap and remove from the oven, leaving aside to cool for around 10mins before cutting up. Once cut, leave for a further 10 minutes to cool before placing in an air tight container. These crackers will keep for up to 5 days.

*If you find that some of the crackers are still a little soft even after cooking for an hour, once cut, place them back in the oven individually for 10-15 more minutes to dry out and crisp up.

Eat, Savoury, Uncategorized

Sweet Potato hash browns

Sometimes, beauty is is messy. Like this hash brown bowl, It’s a little scruffy, it’s a mish mash, but I’ll tell you what, it’s REAL ingredients squished together to make every bite a happy one. The crispy fried potato, fluffy on the inside and crunchy on the outside makes these hash browns sweet and spicy with a jalapeño chilli kick. I topped off this bowl with toasted, smoked chickpeas sunny side up fried eggs AND lets just check out that guac. I tried some new things and magic happened – This in my opinion was my BEST guacamole yet.

Serves 2

Ingredients:

Sweet potato hash

  • 400g Sweet potato
  • 400g White potato
  • 2 Garlic Cloves
  • 1 deseeded Jalapeño chilli
  • 4 button mushrooms
  • 1 tbsp Chopped fresh rosemary
  • 2 -3 tbsp coconut oil
  • Salt and pepper

Smoked chickpeas

  • 1 full can of drained and rinsed chickpeas
  • 1 tbsp smoked paprika
  • 1 tsp of coconut oil

Pistachio Guacamole

  • 1 large avocado
  • Handful of shelled roasted and unsalted pistachios
  • 1/4 Red onion
  • 1/4 Freshly squeezed lemon juice
  • 1 tsp Coconut cream
  • 1 Fresh crushed and chopped garlic clove
  • 1 tbsp Almond meal
  • 1 tbsp Extra virgin olive oil
  • Sprinkle of chilli flakes
  • Salt and pepper

Eggs

  • My preference is x4 PASTURE RASIED BIODIVERSE chicken eggs – x2 per person

Methods:

Sweet potato hash

  1. Fill a large pot with salted water, place onto your stove top on a high flame, and allow water to boil.
  2. Chop white and sweet potato into small cubes – you can keep the skin on or peel it – I’ve kept the skins on – Team crispy skins!
  3. Whilst your potatoes are boiling, get to work preparing the chickpeas and Guacamole
  4. Place chopped potato into the pan of boiling water and leave to cook and soften – to test if your potatoes are cooked, carefully prick them with a knife, if the potatoes texture is soft to pierce, your potatoes are ready to drain.
  5. Place potatoes in a large mixing bowl and add garlic cloves, green chilli, sliced or chopped button mushrooms, freshly chopped rosemary, 1 tbsp of coconut oil and mix with a large spoon to coat the potatoes in all ingredients
  6. On a medium heat add 1 tbsp of oil in a large pan, then tip all ingredients from the mixing bowl into the pan, if your pan is too small and you feel like your ingredients don’t all fit evenly, you may have to do this in two batches as we want all ingredients to crisp and fry on the pan.
  7. With a spoon of spatular, press down on the hash brown ingredients to crisp and toast, after around 5min of cooking, start to flip the hash brown to toast the opposite side, it’s ok if it falls apart slightly of you have to break it up to turn it, were not here to make this look Michelin star worthy – it should look a little messy, as long as you toast and fry both sides it will taste great! Try to avoid burning the potatoes, if the pan looks dry this is where you can add additional oil for frying, when you see the hash browns are crispy on both sides, start to plate them up and leave to cool, whilst you start to fry the eggs – *see FRIED EGGS

Smoked chickpeas

  1. Empty the soaked chickpeas onto a baking tray lined with baking/parchment paper and drizzle your chosen oil over the chickpeas, then dust with smoked paprika, if you shake the pan, you’ll be able to coat all the chickpeas in the oil and spice. Place the tray inside your oven for around 15-20 minutes at 170 C, check on the chickpeas around 2-3 times to give the pan a shake, ensuring all sides are toasted and crispy.
  2. Remove from oven when chickpeas have crisped up and leave to cool for 5mins before eating and serving – this little beauties will crisp up even more once left to cool and harden.

Pistachio guacamole

  1. In a medium bowl add Avocado, finely chopped red onion, shelled and chopped pistachios, fresh lemon juice, coconut cream, almond meal, extra virgin olive oil, chilli flakes, salt, pepper, fresh crushed garlic clove. Smash and mix all the ingredients together with the back of a fork and mix until combined and you have yourself and nice chunky guacamole texture.

Sunny side up, Fried eggs

  1. Probably the easiest step, once you’ve finished cooking your hash browns and they’re plated up ready to go, in the same pan, add a little oil and crack both eggs inside, reason we are using the same pan is not just for saving on washing, we want the eggs to soak up any little crumbs from the hash browns, adding flavour and texture.
  2. When the white of the egg looks cooked through, grab a spatular and carefully scoop and lift your eggs out of the pan to crown your hash brown bowl. From here you can get fancy and add the guacamole, decorated with the smokey chickpeas.
Animal Protein, Eat, Savoury

MISO RAMEN

What can i say, Japan has ruined me for all ramen that’s not from the teeny tiny streets, inside a low ceiling restaurant, where I’d be found hugging a bowl of salty, sweet slurpy ramen. Just the best. By no means have I mastered the true craft of ramen making but I must admit, I do make a mean bowl that tastes somewhat similar and is most certainly super nourishing.

Lucky you; I’m sharing this beautiful bowl of creative Japanese inspired wizardry:

CREATE, MAKE, SLURP AND SMILE – It’s goooood.

Ingredients:

Broth

  • 2 Fresh garlic cloves
  • 1 fresh red chilli
  • 1 shallot
  • 1 tsp bone broth concentrate
  • 5 cups of boiling water
  • 3 tbsp Miso paste
  • 2 tbsp fish sauce
  • 2 tbsp coconut Aminos
  • 3 tsp fresh root ginger
  • Salt
  • Cracked black pepper
  • 2 tbsp coconut milk + 1/2 cup of water
  • 1 tbsp sesame oil
  • Your choice of noodle – here I use chickpea noodles

Toppings

  • 60grams Ground pork
  • 1 tsp Chinese 5spice
  • Salt
  • 1/2 tsp Miso paste

  • Fresh spring onion
  • Chilli flakes
  • Black sesame
  • Asian Mushrooms
  • Shoyu egg – x1 egg + 1tbsp coconut Aminos + 1 cup of cold filtered water

Method:

  1. Grab a large cooking pot and spoon bone broth concentrate and 5 cups of boiling water to the pan and place heat on a low heat to allow the broth the sit and simmer.
  2. Add finely chopped red chilli, crushed garlic, finely chopped shallot, 3 tbsp of miso paste, 3 tbsp fish sauce, 2 tbsp coconut Aminos, 3 tsp freshly grated ginger, salt and pepper to the simmering broth.
  3. Allow to sit and simmer on the lowest possible heat for 3 hours.
  4. SHOYU EGG: Soft boil an egg – place an egg in boiling water for 2mins – immediately submerge into cold water for 10mins. Remove egg from water and peel egg shell away. In a cup add 1tbsp of coconut Aminos and fill the remaining cup halfway with cold water, carefully drop the soft boiled egg into the liquid, over time the egg will absorb the coconut Aminos – given how strong you want the flavour add more or less coconut Aminos.
  5. At around 2.5hours add 2 tbsp of coconut milk + 1/2 cup of water to the broth plus 1 tbsp of sesame oil.
  6. Start to prepare and cook up your veggies and garnishes
  7. Prepare the pork mince by salting, marinating with Chinese 5 spice and 1/2 tsp miso paste. Cook on a medium heat and set aside until your ready to serve onto the top your ramen bowl.
  8. Have a taste of you ramen broth and when you feel it’s close to ready, turn off the heat and boil up your noodles in salted water. Once cooked, drain, serve and pour ramen broth over the noodles and place your garnishes, shoyu egg and additional veggies to your bowl.

Eat and enjoy

Eat, Savoury

Sweet Potato Gnocchi

Soft and sweet pillows of perfection! I bet for most, the idea of making this Italian masterpiece may sound too time consuming and complex, but I can assure you it really is rather easy. Read the simple steps below to create your own.

Ingredients: serves 2

Sweet poato gnocchi

  • 1/4 Flour – Here I have used Cavassa flour, ordinary white bakers flour will work perfectly too, I don’t however recommend nut flours and they don’t hold together when boiling
  • 1 Egg
  • 1 medium cooked (skin off) sweet potato
  • Salt
  • 1 tsp garlic powder (optional)
  • 1 tsp Coconut or olive oil to pan fry

Coconut cream tomato sauce

  • 1 tin chopped tomatoes
  • 3 tbsp fresh organic coconut cream
  • 1 handful of fresh basil
  • 1 garlic clove
  • Black pepper
  • Pinch of salt
  • 1 handful of fresh spinach
  • Chilli flakes – depending on how hot you’d like this, add or leave out the chilli flakes
  • To finish Extra virgin olive oil PLUS your choice of chosen veggies – here I have button mushrooms and green beans

Method: Sweet potato gnocchi

  • On a high heat place water into a saucepan, salt water and boil your peeled, medium sweet potato – leave to boil and soften for around 10mins
  • Once cooked strain and leave aside to cool
  • Measure and place flour, egg, salt and garlic in a food processor (this step can also be done by hand, placing ingredients into a bowl and mixing with a wooden spoon or spatular.
  • Add cooked sweet potato into the food processor and blitz ingredients until a dough consistency has formed – if the dough seems sticky add an additional tbsp of flour and re mix.
  • When all ingredients have combined, dust your worktop with a sprinkle of flour and begin kneading the dough into a soft ‘play dough’ like consistency. Roll out into one long sausage shape and then with the back of a fork, lightly press down onto the dough, scoring the gnocchi from top to bottom as shown in the photo above.
  • With a knife cut inch sized parts so that each piece of gnocchi is a similar square shape.
  • Heat a salted pan of water and bring to the boil
  • Very gently drop your gnocchi one at at time into the boiling water – when the gnocchi have risen to the top they are ready to scoop out and drain.
  • Once all gnocchi are out of there salt bath you can start to heat a frying pan (medium heat) with you tsp of chosen cooking oil
  • Without overcrowding the pan, allow you gnocchi to cook and brown in the pan, when they look golden and crisp – remove them and set to one side.

Coconut cream and tomato sauce:

  • If you have a smoothie blender and or food processor place all ingredients (accept your chosen vegetables- these you will cook separately) inside and blitz up until smooth.
  • Place tomato sauce into a cooking pot and simmer for 5 mins
  • Add gnocchi to the sauce and on a very low heat and simmer for a remaining 5mins whist you either cook up your veggies and or wash up.
  • Serve up with veggies and a drizzle of extra virgin olive oil onto the sauce. ENJOY!
Eat, Savoury, Spreads, Uncategorized

How’s about that HUMMUS…

If you don’t like hummus, don’t come to the party.

Hummus is the winner of dips (along side guacamole of course) I honestly can’t think of anything you couldn’t spread this delightful creamy paste to that doesn’t instantly make it better.

What is Hummus?

Hummus originally occurs in the Middle East, traditionally made with 6 simple ingredients of CHICKPEAS, SESAME PASTE, LEMON, GARLIC, CUMIN POWDER AND OLIVE OIL, It’s also pretty good for you given your GI is happy with legumes, Low in saturated fat, high in fibre and protein, hummus also offers complex carbohydrates to make you feel satisfied and full. And not only that its so simple to make and here’s how;

Ingredients:

Makes up one medium dessert bowl:

  • x2 tins organic chickpeas (if you can find a brand that has removed the skins – Bonus)
  • x2 TBSP sesame paste
  • x2 Garlic Cloves
  • x1 fresh lemon
  • 1/4 cup extra virgin olive oil
  • x1 tsp cumin Powder
  • Pinch of rock salt
  • Optional: Black sesame and or toasted pine nuts to garnish

Method:

  1. Rinse chickpeas in a clean colander and rub vigorously between your hands to remove the skins. This is not 100% necessary but it results in a creamier consistency.
  2. Add chickpeas to your food processor after washing and add x2 TBSP’s of sesame paste, x2 crushed garlic cloves, x1 tsp of cumin powder, freshly squeezed lemon juice from x1 whole lemon, a pinch of salt along with the 1/4 cup of olive oil, you may like to make the texture thick or runny, depending on this you can add more or less olive oil.
  3. Blend until desired consistency is reached. Serve and enjoy
Animal Protein, Eat, Savoury

THE Ultimate Christmas Dinner

Serves 4

Christmas dinner, Sunday roast or quite possibly your weekly meal prep, this meal has EVERYTHING going, to quote Joey from friends “Peas good, potatoes good, meat GOOOOD”

I loved this dinner so much that I actually took it with me on the aeroplane Christmas Day, on route to Japan, just so that I wouldn’t miss out on any Christmas dinner, and lets be honest – Roast dinner over aeroplane food? Is there really any need to question?!

This meal is 100% paleo approved and quite frankly its so very simple to make. 

So if your keen to relive that Christmas dinner experience whatever the weather, look no further than the directions below.

Ingredients:

For the vegetables: 

Cooking time:  45min

Prep time: 10min

X2 Medium Parsnips

X2 Medium Swedes

X2 Medium Broccoli

X1 Large sweet potato

X4 Stalks of kale

X1 Large bag of mushrooms

X1 Medium red pepper/capsicum 

As many Brussel sprouts as you desire

X1 Small Beetroot

Coconut oil

X2 tbsp mixed herbs – fresh or dried

Salt 

PLEASE WASH ALL VEGETABLES BEFORE PREPARING.

Beetroot takes the longest time to bake due to It’s water content, so once you’ve chopped and diced the beetroot you will need around 1 hr of baking time, no oil yet, just salt to dry it out, later when it looks dried out, you can add the oil to give it a crispy texture.

Place swedes, sweet potato and parsnips in a large baking tray with x2 TBSP of coconut oil, sprinkle your mixed herbs over, stir the vegetables around the pan so they get an even coverage of coconut oil to brown and crisp up. 

Place in oven for 45 mins at 190 F

Next, make up a new tray for mushrooms, broccoli and capsicum, chop and dice however you wish, just add salt to these and cook up for 20min

We need another separate pan for your roasted kale, add x2 tbsp of coconut oil and a generous sprinkle of salt rub and massage kale into the oil so it gets coated in oil, giving it a beautiful nutty crunch when cooked. Bake for 5-8 mins

For the chicken:

Cooking time:  45min

Prep time: 5min

Cajun seasoning 

Black pepper

Salt

Bacon – optional

Place chicken in a large dish with half a cup of cold water. Coat the chicken in coconut oil and season with cajun spice, salt and black pepper. 

Place chicken in oven on middle shelf for 45min at 190F 

To check chicken is cooked the juices will run clear and the meat will be white. Do not remove chicken from the oven if the meat is red or pink. 

Add bacon part way through baking – toward the halfway bake if desired to the chicken breast 

For the gravy:

Cooking time:  20min

Prep time: 5min

X1 small tin of tomato paste

Sprinkle mixed herbs

X1 cup of boiling water

X1 tsp Boost Bone broth concentrate from https://au.meadowandmarrow.com/?gclid=Cj0KCQiArdLvBRCrARIsAGhB_sxCRUXJL0JPvlB3gxLNElpGoSCtomg7BZES_fP6M5wvZkBNZ1cVdEoaAnNuEALw_wcB

Mix all ingredients together in a small saucepan and heat until thickened. 

For the stuffing balls:

Cooking time:  20min

Prep time: 5min

X2 Free range, organic sausages

Mixed herbs

X1 cup almond meal

X1 egg

Black pepper

Carefully cut down the sausage to remove the meat and add to a bowl, add all other ingredients and mix. Tablespoon mixture into the palm of your hand to make small stuffing balls. 

Bake in oven for 10-15mins

Plate it up!

Arrange all the veggies on the plate just as you would like them, cut away all the chicken from the bone so you are left with moist, juicy chicken. Drizzle the gravy as you desire, then serve up and enjoy. 


Eat, Savoury

Paleo Cauliflower Pizza

Who doesn’t love a slice of pizza?!

I for one used to be the regular to binge on a take out pizza of a Saturday night, meat lovers was my go to, slathered in the rich sweet yet salty bbq sauce, I’m certain now my arteries are thanking me for cutting these out. Now things have changed a little and a while ago I decided to take on the challenge and make and create my own cauliflower base pizza, like so many other food bloggers had done before me, after all how hard can it be? 

Well, not so hard it would seem, If you’re willing to spend a bit of time cooking up this masterpiece, It will be totally worth it when it comes to devouring the whole thing (unless you’re willing to share) I can assure you, like anything worthwhile it takes a bit of time. Like any of my recipes, bake this with an open mind to explore new flavours and textures, as we all have different preferences – this is not a wheat based pizza, therefore it wont taste like your staple pizza base – In my opinion, it will taste better! This Pizza base holds together beautifully, its soft, light and herby, when topped with the rich tomato sauce and all your favourite toppings the whole pizza comes together and each slice is truly incredible, so lets get stared;  

Ingredients:

Serves 1-2

Pizza base:

  • 1/2 Cauliflower head
  • x1 cup cavassa flour
  • X2 pasture raised eggs
  • 1 tsp baking powder
  • 1 tbsp coconut flour
  • 1 tbsp water
  • Pinch of salt

Tomato base:

  • x3 tbsp tomato puree
  • 1 tbsp mixed herbs
  • X1 clove garlic
  • 1 tsp chilli flakes
  • Cracked black pepper

Topping ideas:

  • Roasted artichoke
  • Red bull horn pepper
  • Mixed olives
  • Button mushroom
  • Red onion
  • Maple bacon (please choose organic/free range pasture fed pork)

Method:

Pizza base:

Using a hand held grater or if your lucky enough to own a food processor, grate half a cauliflower head and bake for 20min, seasoning with salt to dry out the moisture. Bake at 180C. Check on the cauliflower and stir around the baking tray to ensure each piece of grated goodness is baked. 

When your cauliflower has partially dried out, remove from the oven and leave to cool for a moment whilst you mix up your cup of cavassa flour, tbsp of coconut flour, 1 tsp of baking flour, water, salt and eggs. We want to add the cauliflower in when its warm to cool as if we add it in hot, the eggs will scramble. 

When all mixed together you should have a slightly sticky ball of cauliflower, please don’t expect it to look like a ball of dough, it will look and feel a little different but I can assure you this will bake beautifully! Grab a piece of baking paper (enough to cover your baking tray) place a large dinner plate upside-down on the paper and draw a circle around the plate to score a circular outline to press your base around. I oil the back of a stainless steel spoon and press the base down as thin as I can whilst keeping within the circular outline. 

Place your cauliflower creation into the oven at 180C for around 10-15 minutes. When browned and crispy to touch, flip the base over and bake or a remaining 5 minutes. 

Tomato base:

This is the easy part, here you take 3 tbsp of the tomato puree and place in a bowl, add the mixed herbs, black pepper, chilli flakes and garlic clove and mix them altogether. 

Let’s build this beauty:

When browned and firm to touch, remove your cauliflower base from the oven and leave to cool for 2mins. Take your tomato puree topping and spread evenly across the base, chop and prepare your toppings as you wish and spread them evenly across the pizza. When you’re happy with the way your pizza looks place it in the oven to cook for a further 10-15mins until all the toppings look soft and browned. By no means is this a quick, store bought, oven baked pizza, but it is delicious and truly believe its worth the wait. 

Remove from the oven – let it sit for 5, take some photos of your creation and show me! Then by the time you’ve finished food snapping, your pizza will be ready to eat!

For an extra touch you can add a drizzle of EVOO to finish and I’ve actually in the past added a fried egg which I believe works very well, If you like to eat your pizza with ketchup, why not pair it with my Zingy paleo tomato sauce; https://goodnessgreen.blog/2019/04/09/homemade-paleo-ketchup/

Eat and enjoy with the piece of mind that every single bite of this pizza is totally healthy and wholesome! 

Animal Protein, Eat, Savoury

Paleo Quiche

When I used to live in paddington, on the long commute back home of a Saturday afternoon, I would occasional stop by a health store that was also a cafe, serving a whole variety of delicious vegetarian meals, in there glass fridge they would have a paleo quiche that on the rare occasion I would say F it, I’ll pay $9 AUD for one slice of this delicious goodness, I remember thinking, one day I will learn to make my own as the cost of one slice from this cafe is quite frankly a joke and lets be honest how hard can it really be to make?

This was about 2 years ago and I’m now getting around to making it up from scratch. I’m not sure why it took me so long to make a paleo quiche but I’m now thinking holy hell, this is an absolute game changer! I could potentially eat this everyday for breakfast, lunch and or dinner anytime! It’s so easy to make, inexpensive, SO SO nutritious and eating it is a pleasure! Already I’m fuelled with new ideas for different ingredients and flavours to experiment with. If you’ve got a spare 20mins in your day to prep up this king creation then you will be sure to fuel your insides with all the goodness this quiche has to offer for the week. 

Lets get started…..

Ingredients:

Add in whatever takes your fancy – these are the ingredients I baked inside;

The Filling:

  • 1/2 Roasted Zucchini 
  • 1/2 Roasted Red onion
  • 1 Garlic clove
  • 1 cup Chopped Butternut Pumpkin 
  • 1/2 Beetroot
  • Handful of Green Beans
  • 1 cup of Button Mushrooms
  • 1 TBSP Mixed seeds
  • 1 TBSP Coconut flour
  • 1 TBSP Gelatin
  • 1 can Organic creamed coconut flesh
  • 1 TSP Ground Coriander 
  • 1 TSP Ground cumin 
  • 4 Eggs
  • 1 TBSP Filtered water
  • 1 TSP Chilli Flakes
  • Pinch of rock salt
  • Black pepper to taste

Base/Crust:

  • 1.5 cups of LSA Meal (linseed, sunflower seed and almond flour)
  • Pinch of salt
  • Black Pepper to taste
  • 1 TSP cumin powder
  • 1 TSP liquid coconut oil
  • 1 TBSP Water
  • 1 Egg

Method:

Starting with your veggies, I very thinly (the width of a sliver 5c coin) slice up the zucchini, beetroot, onion and button mushrooms and lay them individually in a cast iron baking dish in the oven for 10-15mins at 180C.

I place the butternut and green beans in boiling water and leave to soften for around 10min on a medium heat. 

Whilst your veggies are cooking you can start to make up your batter, which consists of the eggs, cumin and coriander powder, salt, pepper, water, chilli flakes, coconut flour, gelatin, mixed seeds and coconut cream. Whisk these altogether with a hand held whilst to combine all the lovely flavours.

Set aside for a moment and start to make the quiche crust;

This is super easy to make, all you need is your pie tin/dish 23mm wide. In a large mixing bowl, combine all ingredients and mix until you have what resembles somewhat a dough ball. 

Greece your pie dish with oil and place the dough ball in the middle and start to flatten down the crust with the back of a metal spoon. 

Once flattened, prick the base with a fork and when your veggies have browned and crisped up to your liking, remove form the oven and place the pie dish inside to cook on a low heat around 160C for round 10mins – when removed the crust base should feel firm to touch. Set aside and leave to cool. 

Next, when all vegetables are cooked through, including your butternut and green beans, place them into your coconut cream and egg filling. 

Stir to combine and pour over the crust base, gently place inside the oven to cook for 15-20mins at 180C until the filling has risen, looks brown and firm to touch. Be careful when testing the texture, as it may still be very hot. 

Once cooked through leave aside to set and cool for around 15-20min. I actually left mine to cool for a few hours, placed it the fridge and ate it cold for breakfast the following morning, it was fantastic! I’ll be completely honest I actually ate half of this quiche throughout the day as it was so tasty! I hope you enjoy it as much as I do!

Let me know if you have any comments or questions on this, id love to hear your thoughts. 

Animal Protein, Eat, Savoury

Shakshuka

What is Shakshuka?

You may know this meal as ‘baked eggs’ in some cafes that will serve this dish up in a traditional cast iron skillet. This middle eastern meal is great at any time of the day as it’s filling, nutritious and it takes merely moments to create as it’s a one and done recipe. The delicious combination of eggs, tomatoes and spices originating from the east make this breakfast banger one to wake up to.

Serves 1

Ingredients: 

½ red onion

1 yellow red pepper/capsicum

1 red pepper / capsicum

1 garlic clove

½ grated red chilli

3 button mushrooms

½ Avocado

½ cup of chopped sweet potato

2 pasture raised eggs

1 can of chopped tomatoes

Handful of chopped parsley

 2 tsp smoked paprika

1 tsp ground cumin

Pinch of rock salt

Black pepper

½ cup of water

Optional:

Coconut yoghurt

Chorizo

Method:

Cook time: 25-30mins

Set your oven on a fan forced setting at 180c.

In a large mixing bowl place all ingredients EXCEPT your pasture raised eggs and yoghurt.

Mix together the ingredients until it forms a chunky salsa like consistency, stir so all spices have coated the veggies. Grease your skillet pan in a nut or avocado oil (something with a high smoking point, to avoid releasing any dangerous toxins found in highly processed vegetable oils) when this is done you can add your coated veggies into the pan and place in the oven for roughly 25mins, If you would like to leave it longer to fully break down the vegetables you may do so. When you’ve checked your Shakshuka at around 25minutes you can very carefully remove the skillet pan from the oven using appropriate oven gloves, then with a dessert spoon, create 2 small nest like holes in the middle of the dish and crack your happy hen eggs inside. Place the skillet back into the oven for around 5 mins to allow the eggs to cook through, however you like them, runny, soft or hard? 5 minutes will allow then to cook slightly runny.

After 5 minutes, carefully remove the skillet pan from the oven and leave to cool for 5 minutes (a good time to make yourself a coffee) add coconut yoghurt to serve and sprinkle with fresh parsley and a drizzle of quality extra virgin olive oil.